Rebecca’s Recipe of the Week: A Super Paella
I made this on Monday, for a couple of colleagues who were coming round before the start of the new academic year. I thought it was pretty delicious. Serve with tomato salad and a glass of red wine. The recipe is a bit lengthy but it’s not complicated or demanding.
Paella de Cerdo con Chorizo y Espinaca [Paella with Pork, Chorizo and Spinach]
Serves 6
Ingredients
2 dried, mild chile peppers (the recipe calls for Spanish ‘ñoras’ peppers; I used Mexican ancho chiles), or an additional teaspoon of paprika
7 tablespoons olive oil
350g pork tenderloin, halved lengthwise and then sliced into 7mm slices
Salt and pepper
120g mild cooking chorizo, peeled and cut into little pieces
2 large onions (or about 8 minute Canalside onions), finely chopped
1 green pepper, finely chopped
4 garlic cloves, finely chopped
250g paella rice
1 teaspoon sweet smoked Spanish paprika, or 2 teaspoons if you’re not using the dried chiles
900ml hot water
500g spinach, washed and chopped roughly
1 lemon, cut into wedges, to serve
Preparation
Tear the dried peppers, if you are using them, into small pieces and put them into a bowl. Cover them with boiling water and leave them to sit so that they soften up a bit while you prepare the rest of the dish.
In a 30-40cm paella pan or a large frying pan, heat the olive oil over a high heat, and then stir-fry the pork for a minute, until it is still a bit undercooked but has browned on the outside. Season with salt and pepper and remove from the pan with a slotted spoon. Set the pork aside for later.
Turn the heat to low and add the chorizo. Fry for a minute and then add the onions and peppers. Cook for 20 minutes, stirring occasionally, until the mixture is soft and sweet. Add the garlic and cook for 10 minutes more.
Add the rice and stir well. Cook for a minute, stirring, so that the rice picks up the flavours. At this point the cooking can be paused—the remaining steps will take about 20 minutes more.
Season the pan with more salt and pepper, and add the paprika and peppers, drained of their water (if you’re using them). Toss. Pour in the hot stock. Simmer for 15 minutes, or until there is just a thin layer of liquid around the rice. Stir occasionally.
Meanwhile, cook the spinach: put it in a pan with a bit of water and cook it until it’s just wilted. Drain.
Scatter the spinach and the cooked pork over the top of the rice, and stir to mix. Cover with a lid or some foil and leave for an additional 5 minutes.
Serve garnished with lemon wedges and the tomato salad.
Recipe adapted form Sam and Sam Clark, Moro: The Cookbook (2001).
Rebecca’s Recipe of the Week: Courgette and Basil Soup
A friend gave me a very long courgette. It was about ¾ of a meter long. Actually, she gave me two. Research suggests that they are ‘Sicilian courgettes’—genuine courgettes (not hard-skinned marrows) that simply grow to extraordinary lengths. Anyway, we’ve been eating courgettes. Fortunately they are delicious, and came accompanied by several recipe suggestions. This one is for an exceptional courgette soup.
The courgettes are roasted together with onion and garlic, which gives the flavour an unexpected complexity. Peas bring additional sweetness and this is a good way to use the fresh basil we’re enjoying in the shares. As with most soups you can vary the proportions and quantities a bit to match what you have to hand. Serve with crusty bread and some grated cheese.
Roasted Courgette Soup with Peas and Basil
Serves 3
Ingredients
2 tablespoons rapeseed or olive oil
1kg courgettes (approx.)
4 garlic cloves (unpeeled)
7 tiny Canalside onions (or 2 medium onions)
Salt and pepper, to taste
200g frozen peas
20g fresh basil
750 ml stock
4 tablespoons full-fat milk
Parmesan or pecorino, to serve
Preparation
Preheat the oven to 200C. Drizzle the oil onto a large baking sheet.
Trim the ends off the courgettes and slice them into rounds about 1 cm thick. Place them on the baking sheet and scatter the unpeeled garlic cloves around them. Peel the onions, and if they are the tiny Canalside ones leave them whole and scatter them alongside the courgette and garlic. If they’re a bit larger slice them into thick slices before adding them to the baking tray.
Season with salt and pepper, toss them around a bit, and roast them for 40-45 minutes, until the vegetables are golden brown and roasted. Don’t let them char to a crisp but let them get toasted. Remove from the oven and let cool a bit.
Once the vegetables are cool enough to handle squeeze the roasted garlic flesh out of their paper skins into a pan. Add the remaining vegetables, the peas and the basil.
When you’re ready to serve, heat the stock and add it to the pan together with the milk. Blend the soup using an immersion blender and heat gently until warm. Add some additional water if you’d like the consistency to be a bit thinner. Serve with grated cheese on top.
Recipe adapted from The Veg Space, courtesy of Jean Noonan.
Rebecca’s Recipe of the Week: A Fish Dinner
Grilled mackerel with cucumber-fennel relish, boiled potatoes, and, perhaps some steamed fresh spinach: between two people you can have this on the table in 25 minutes from turning on the grill. It makes a lovely Saturday night supper. Grill the fish whole for 8-12 minutes per side.
The relish or salsa has a crisp, assertive sharpness that contrasts well with the rich oiliness of the mackerel. It would be good with grilled trout, as well. The recipe makes enough for four generous servings. The key is to cut the vegetable into very small pieces; it’s this that gives its charm. ‘Dicing’ is cutting into cubes—but you can also simply chop the cucumber and fennel very fine, if producing tiny cubes seems too fiddly.
Cucumber-Fennel Relish
Ingredients
1 cucumber, cut into 3mm dice
1 small fennel bulb, cut into 3mm dice
¾ cup chopped fresh dill
zest and juice of 1 lemon
2 tablespoons cider vinegar
¾ teaspoon Demerara sugar
¾ teaspoon salt, or to taste
½ teaspoon black pepper, or to taste
Preparation
Combine all the ingredients and taste for seasoning. Add more salt, pepper, sugar or vinegar/lemon juice if you wish—this should be quite sharp.
Rebecca’s Recipe of the Week: An Excellent Nibble
The great chef James Beard declared that in his kitchen no pepper was used until it had been roasted. I would not go quite that far, but roasting certainly transforms a pepper into something irresistibly delicious. It’s easy to do. Roasted peppers can be used in many ways—I’ll mention a few in a minute—but it’s hardly worth the effort since in my experience a dish of roasted peppers in a little olive oil and salt will be gobbled up immediately. Serve with an aperitivo or as part of your meal.
If by some miracle the peppers don’t get consumed on the spot you can arrange them on a platter with a few quartered hard-cooked eggs, black olives, and fresh basil, to make a little salad (drizzle with more olive oil before serving). Or use anchovies instead of or in addition to the eggs. You can drape them over a pizza. You can mix them with a tin of white beans, parsley, chopped tomatoes, and olive oil for a more substantial lunch. But really you’re going to eat these right away.
Roasted Peppers
Ingredients
Whole peppers of any colour or shape
Olive oil
Salt and pepper
Fresh basil or parsley (optional)
Preparation
Preheat your grill. Arrange the peppers on a baking tray or oven rack and place them about 4 inches from the grill. Roast the peppers for 8-10 minutes, turning them regularly, until they are charred on all sides. The goal is for the skin to go black and flaky so that it can be removed easily.
Once each peppers is charred on all sides remove it from the oven and set it aside to cool a bit. When it’s cool enough to handle rub off the charred skin to reveal the smooth, roasted flesh underneath. Don’t run it under the tap or you’ll remove the flavour. Cut the pepper in half and remove the seeds.
Slice the halved peppers into long strips and put in a bowl. Drizzle with olive oil, and sprinkle with salt and pepper. Add chopped herbs if you wish. They’re ready to serve.
Rebecca’s Recipe of the Week: Mediterranean Green Beans and Tomatoes
When you cook beans slowly in olive oil the result is quite different from the snappy crispness produced by a quick dip in boiling water. The oil and tomatoes meld into a rich sauce that gives the dish substance and depth. Add some fresh basil and a slice of salty cheese, and enjoy for dinner with some crusty bread and a glass of red wine.
Rachel Roddy recommends you let the beans sit for a couple of hours before eating them but I think they’re pretty good straight away as well.
Braised Green Beans with Tomato and Basil
Serves 3-4
Ingredients
6 tablespoons olive oil
1 large or 2 small white onions, peeled and sliced thin
Salt
750g green beans or runner beans
750g ripe tomatoes, peeled if you wish, chopped coarsely
A handful of torn basil leaves
Feta, or other salty cheese, sliced, to serve (optional)
Preparation
Warm the oil in a heavy-based frying pan (with a lid) over a medium-low flame. Gently fry the onion with a pinch of salt until it is soft and translucent.
Cut or break the beans into 5cm-long pieces. Add them to the pan and stir well until each piece is glistening with oil. Continue cooking and stirring for a few minutes.
Add the tomatoes and another small pinch of salt, stir, then cover the frying pan. After a couple of minutes uncover the pan and stir – the tomatoes should be relinquishing their juices. Cover the pan and cook for another 5 minutes or so.
Once the tomatoes have given up their juice, uncover the pan and allow it to simmer, uncovered, stirring every now and then for around 40–50 minutes, or until the beans have become very tender and the tomatoes have reduced into a thick, rich sauce. During the final few minutes of cooking time, stir in the ripped basil leaves. Taste and season with more salt, if necessary.
Serve with slices of feta, if desired, or let them sit for a few hours before eating. These are very good the next day, as well.
Recipe adapted from Rachel Roddy, The Guardian, 23 May 2017.
Rebecca’s Recipe of the Week: A Middle Eastern Tomato Salad
The allspice and pomegranate molasses give this salad unusual complexity. The more varieties and colours of tomato you can include in this salad, the more festive it will look. The yellow and orange varieties look particularly attractive. Cutting everything into little cubes takes longer than just chopping into chunks, but the result is worth it: the flavours blend and create a harmonious, smoky dish quite unlike an ordinary tomato salad.
The best way to get the seeds out of a pomegranate is to bash the fruit against the inside of your sink on all sides. Bash it vigorously but cautiously so that it doesn’t actually split open. The goal is to soften and loosen the seeds while they are still inside the skin. Then hold the fruit over a bowl and break it open. The seeds should come out fairly easily.
Tomato and Pomegranate Salad
serves 4.
Ingredients
1 kg tomatoes, cut into ½cm dice
1 red pepper, cut into ½cm dice
1 small red onion, finely diced
2 cloves garlic, crushed with a pinch of salt
½ tsp ground allspice
2 teaspoons white wine or cider vinegar
1½ tablespoons pomegranate molasses
60ml olive oil, plus a little extra to drizzle at the end
1 pomegranate, seeds removed
1 tablespoon oregano leaves, to garnish
Salt and black pepper
Preparation
In a large bowl, mix together the tomatoes, red pepper and onion and set aside.
In a small bowl whisk the garlic, allspice, vinegar, pomegranate molasses and olive oil, until well combined. Pour this over the vegetables and mix gently. Add salt and pepper to taste.
Arrange the tomato mixture and the juices on a large flat plate. Sprinkle with the pomegranate seeds and oregano, and finish with a drizzle of olive oil.
Recipe adapted from Yotam Ottolenghi, Plenty More (2014).
17th Aug
Three Bruschettas
A bruschetta is an Italian open-faced sandwich. To make it you grill some good sourdough bread, rub it with a bit of garlic, drizzle it with olive oil, and add a topping. Roast courgette, grilled aubergine, and chickpeas with Swiss chard all make tasty and quick toppings. Make just one, or serve all three for a fresh and summery dinner.
Basic Bruschetta
For each bruschetta you need:
Ingredients
1 generous slice of a decent sourdough bread
1 garlic clove, peeled
Olive oil, to drizzle
Grill the bread on both sides. Grilling gives a better result, but you can use a toaster if need be. Rub the grilled bread on one side with the garlic, and drizzle with olive oil. Your bruschetta base is now ready for a topping.
Roast Courgette
Enough to top 1-2 bruschetta
Ingredients
1 medium courgette
Olive oil to drizzle
¼ fresh red chile, chopped, or to taste
Several sprigs of fresh mint, chopped
Preheat oven to 200C. Cut the courgette lengthwise into 5mm slices. Place slices on a baking sheet and drizzle with olive oil. Bake until crisp, about 10 minutes. Turn the slices over part-way through so they get crisp on both sides. Mix the roast courgettes with the chopped chiles and mint, arrange on the bruschetta, add a final drizzle of olive oil, and eat.
Grilled Aubergine
Enough to top 2 bruschetta
Ingredients
1 Canalside aubergine (i.e. one very small aubergine. . .)
Olive oil
Lemon juice
Small handful of fresh basil, shredded
Salt and pepper, to taste
¼ fresh red chile, chopped, or to taste
Preheat the grill. Cut the aubergine into very thin slices and arrange in the grill pan. Grill on both sides until tender, about 10 minutes in total. Don’t forget to turn them over halfway through. Toss the grilled aubergine with a tablespoon or two of olive oil, a good squeeze of lemon juice, the shredded basil, and salt and pepper to taste. Arrange on the bruschetta, top with the chopped chile, and serve.
Chickpea Chard
Enough to top 2 bruschetta
Ingredients
About 200g Swiss chard (or spinach)
Olive oil
1 garlic clove, minced
Salt and pepper, to taste
1 400g tin of chickpeas, drained and rinsed
Juice of 1 lemon
¼ fresh red chile, chopped, or to taste
Boil the chard in water until tender, about 3-6 minutes. Drain and chop roughly. Return the cooked chard to the pan with about a tablespoon of olive oil and the garlic, and braise for another 5 minutes or so. Season and set aside.
Heat the chickpeas in a pan with another tablespoon or two of olive oil and the lemon juice, just until warm. Purée or mash the chickpeas and season to taste. Spread some of the puréed chick peas over part of each bruschetta, and arrange some chard alongside it, so that the two toppings are next to each other, rather than one on top of the other. Sprinkle the chile over the top, drizzle with a little more olive oil and eat.
Recipes adapted from Rose Gray and Ruth Rogers, River Cafe Cook Book Easy (2003).
Rebecca’s Recipe of the Week: Three Bruschettas
Welcome back to Rebecca – here’s her first recipe after her break in July:
A bruschetta is an Italian open-faced sandwich. To make it you grill some good sourdough bread, rub it with a bit of garlic, drizzle it with olive oil, and add a topping. Roast courgette, grilled aubergine, and chickpeas with Swiss chard all make tasty and quick toppings. Make just one, or serve all three for a fresh and summery dinner.
Basic Bruschetta
For each bruschetta you need:
Ingredients
1 generous slice of a decent sourdough bread
1 garlic clove, peeled
Olive oil, to drizzle
Grill the bread on both sides. Grilling gives a better result, but you can use a toaster if need be. Rub the grilled bread on one side with the garlic, and drizzle with olive oil. Your bruschetta base is now ready for a topping.
Roast Courgette
Enough to top 1-2 bruschetta
Ingredients
1 medium courgette
Olive oil to drizzle
¼ fresh red chile, chopped, or to taste
Several sprigs of fresh mint, chopped
Preheat oven to 200C. Cut the courgette lengthwise into 5mm slices. Place slices on a baking sheet and drizzle with olive oil. Bake until crisp, about 10 minutes. Turn the slices over part-way through so they get crisp on both sides. Mix the roast courgettes with the chopped chiles and mint, arrange on the bruschetta, add a final drizzle of olive oil, and eat.
Grilled Aubergine
Enough to top 2 bruschetta
Ingredients
1 Canalside aubergine (i.e. one very small aubergine. . .)
Olive oil
Lemon juice
Small handful of fresh basil, shredded
Salt and pepper, to taste
¼ fresh red chile, chopped, or to taste
Preheat the grill. Cut the aubergine into very thin slices and arrange in the grill pan. Grill on both sides until tender, about 10 minutes in total. Don’t forget to turn them over halfway through. Toss the grilled aubergine with a tablespoon or two of olive oil, a good squeeze of lemon juice, the shredded basil, and salt and pepper to taste. Arrange on the bruschetta, top with the chopped chile, and serve.
Chickpea Chard
Enough to top 2 bruschetta
Ingredients
About 200g Swiss chard (or spinach)
Olive oil
1 garlic clove, minced
Salt and pepper, to taste
1 400g tin of chickpeas, drained and rinsed
Juice of 1 lemon
¼ fresh red chile, chopped, or to taste
Boil the chard in water until tender, about 3-6 minutes. Drain and chop roughly. Return the cooked chard to the pan with about a tablespoon of olive oil and the garlic, and braise for another 5 minutes or so. Season and set aside.
Heat the chickpeas in a pan with another tablespoon or two of olive oil and the lemon juice, just until warm. Purée or mash the chickpeas and season to taste. Spread some of the puréed chick peas over part of each bruschetta, and arrange some chard alongside it, so that the two toppings are next to each other, rather than one on top of the other. Sprinkle the chile over the top, drizzle with a little more olive oil and eat.
Recipes adapted from Rose Gray and Ruth Rogers, River Cafe Cook Book Easy (2003).
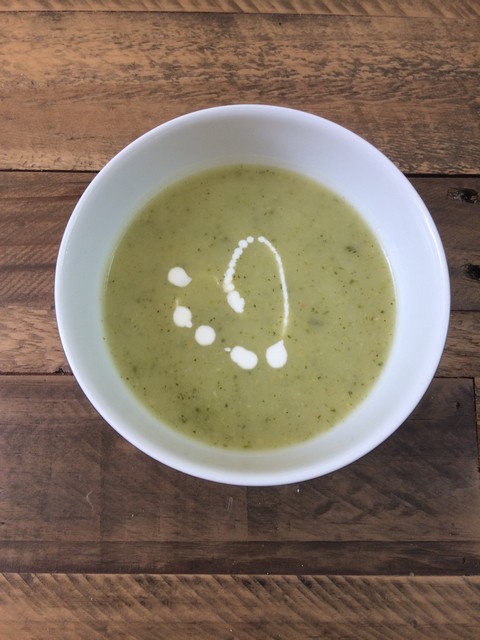
Pip’s Recipe of the Week: For a Courgette Moment
We have a bonus recipe from Pip Smith, after thinking that last week was going to be her last contribution for now! Our resident Recipe Meister, Rebecca Earle, will be back next week.
Having a courgette moment? Don’t feel like making courgetti? Luckily warm soup is also a great idea in the hot weather – it’s all about keeping on top of your fluids when you are losing so much in the heat. This is a really simple ‘recipe’ and a hit in our household even during the summer months.
Potato and courgette soup
serves 4
Ingredients:
1 large or 2 medium courgettes in thick slices
4 medium potatoes
1 white onion
1 organic stock cube
2 tbsp margarine
Method:
Chop the onion and potato into small chunks.
Heat the margarine in a large pan.
Add the potato and onion and sauté for 5-10 mins
Add the courgette for 1 min
Add 800ml stock, bring to the boil and simmer for 15 mins.
Whizz with a hand blender
We like to serve ours with a drizzle of single cream.
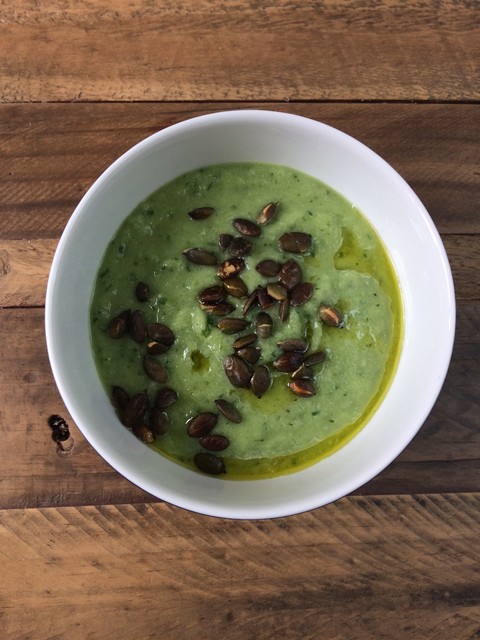
Pip’s Recipe of the Week: Hot weather? How about a cold soup?
Our resident Recipe Meister, Rebecca Earle, is having a break during July, and so newly joined member Pip Smith has stepped forward to tantalise our tastebuds in Rebecca’s absence. Thanks Pip for standing in. Here’s this week’s recipe, the final one from Pip in this guest slot – Rebecca will be back next time:
This is an adapted recipe from a soup in Anna Jones ‘a modern way to cook’ – it’s adapted only because I don’t have the recipe book anymore, otherwise I would have followed it! With all this hot weather there’s probably nothing more important than keeping well hydrated. We take in a lot of our daily water from our food, in particular from fruits and vegetables. When I looked at the cucumbers in my fridge I immediately fancied a cool and hydrating soup, here’s the recipe I used.
Avocado and cucumber soup
Ingredients:
1 1/2 cucumbers chopped
The flesh of 1 avocado
The juice of 1 lemon
1 handful of basil
2 spring onions
2 handfuls of toasted seeds
Extra virgin olive oil
Salt and pepper to taste
Method:
Pop the cucumber, avocado, basil, spring onion and lemon juice into a blender or use a stick blender and deep bowl.
Season with salt and pepper.
Dish into bowls, sprinkle with toasted seeds and a dash of extra virgin olive oil.
Optional – you might like to chill before serving. I mean the soup.
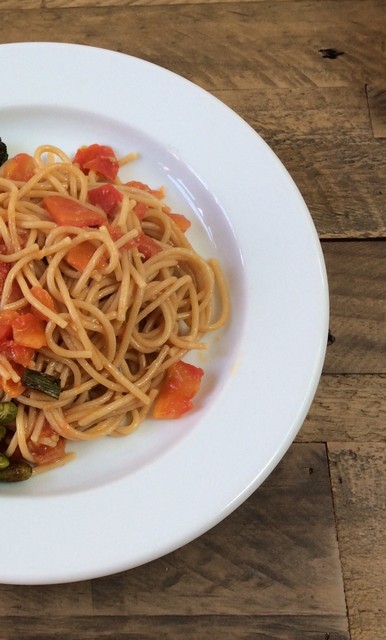
Pip’s Recipe of the Week: Magic Pasta Pot
Our resident Recipe Meister, Rebecca Earle, is having a break during July, and so newly joined member Pip Smith has stepped forward to tantalise our tastebuds in Rebecca’s absence. Here’s this week’s recipe:
Magic one pot pasta with tomato and greens
This is a lovely dish slightly adapted from Anna Jones ‘a modern way to cook’. In this recipe you will only need to use one pot and pretty much everything gets thrown in at the start so not only is it super tasty, it’s also super easy. Initially I was unsure about eating the pasta water as part of the sauce after years of habit of discarding the starchy water. However, I have since learnt that this starchy water helps to bind the sauce to the pasta and improve the texture. It’s a good idea to always save some of the starchy water and add it to your sauce before stirring in the pasta. There are many other uses for the starchy water so it’s worth draining into a container then deciding how you want to use it. Anyway, in this recipe it ends up in your tummy.
Serves 4
Ingredients:
400g wholemeal spaghetti
500g fresh tomatoes, chopped
200g spinach, roughly chopped
160g kale, stalks removed and leaves chopped
Zest of 2 lemons
2 tsp salt
1 litre of boiling water
100mls olive oil
Add everything to the pan except the spinach and kale. Bring to boil and simmer for 6 minutes, add the kale and spinach and cook for a further 2 – 3 minutes.
Boom – enjoy!