Rebecca’s Recipe of the Week: Celebrating La Jimena
We all need a good cocktail now and then. This is my new favourite. It’s an ideal way to use your remaining La Jimena oranges. Alternatively, it’s very good with blood orange juice, if you can lay your hands on any.
To make a twist of orange zest, use a vegetable peeler to cut a long strip of zest from the orange before you juice it. If you want to be super-elegant you can use a knife to trim the edges to produce a long, thin (2mm) strip. Carefully shape the strip into a tight corkscrew shape before placing it on top of your drink in the glass.

Blood and Sand
Serves 1
Ingredients
25ml fresh orange juice
30ml whisky
15ml sweet red vermouth
15ml cherry brandy
1 twist of orange zest, to garnish
Preparation
Fill a cocktail glass with ice to chill while you prepare the cocktail. (Discard the ice before you fill the glass.)
Put the orange juice into a blender and whizz for 30 seconds so that it gets a bit frothy.
Put the whisky, vermouth and cherry liqueur in a cocktail shaker with lots of ice and shake vigorously.
Gently fold in the fluffy, blitzed orange juice into the shaker, and then strain into the chilled glass.
Garnish with the orange twist and enjoy.
Recipe adapted from The Guardian, 21 Feb. 2020.
Rob’s Recipe of the Week: Beetroot – something a little different…
In the summer I went biking in the alps and was lucky enough to stay at a chalet hosted by an ex-River cottage and Heston Blumenthal employed chef (White Room MTB if anyone is interested). Every afternoon we would return to find cake ready and waiting for us and the beetroot chocolate cake below was so good I had to ask Matty to put it up on his blog!
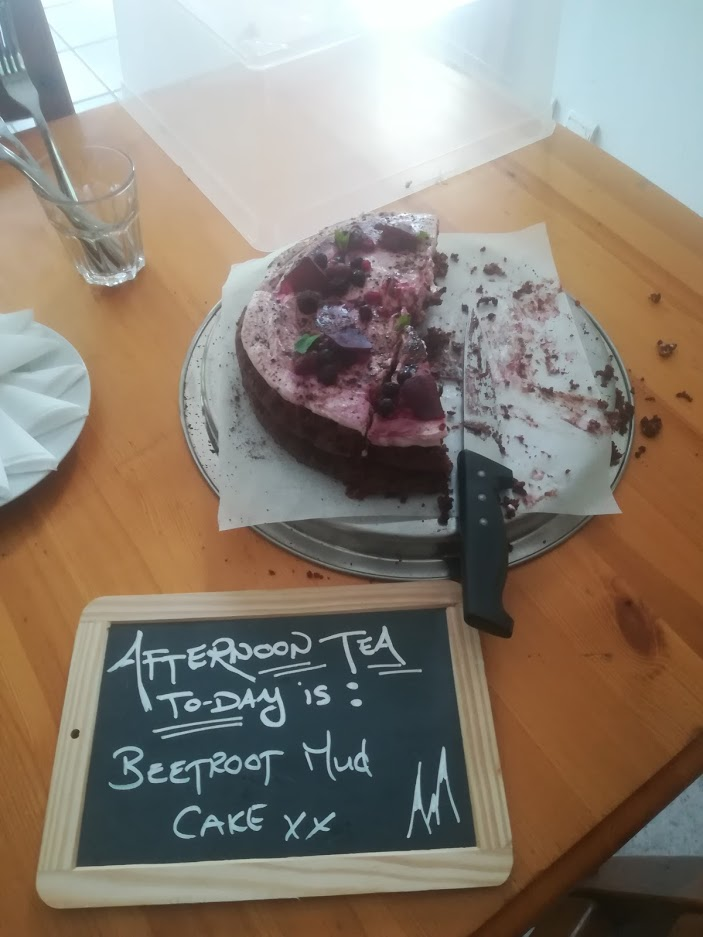
Beetroot brownie cake
Ingredients for the cake – This makes two 8-inch cake tins:
125 g dark chocolate (70% or over)
125 g unsalted butter
2 whole eggs
125 g caster sugar
1 large grated beetroot
95 g flour
40 g pure cocoa powder
1 tsp baking powder
1 tbs Butter & flour for greasing your cake tins or use baking paper.
Method:
Pre heat your oven to 175°c. Grease and line 2 x 8 inch cake tins with butter and flour or baking paper.
Gently melt butter and chocolate together using a double boiler or a microwave until melted.
Meanwhile using an electric mixer whip the sugar and eggs until light and fluffy.
Pour the melted butter and chocolate mixture into the whipped eggs and continue beating for about a minute.
Then grate a large beetroot into the mixture and stir until all incorporated.
Sift in the dry ingredients into the wet ingredients and mix until all incorporated.
Divide the mix into both cake tins and bake for about 25 to 35 minutes depending on your oven. When the cake is ready it will be soft but not a raw liquid wobble if you know what I mean. If it’s still batter keep it cooking.
Once cooked take out of the oven and let it cool on the side until ready to garnish.
This cake is good as is. However covering anything with cream and more chocolate will always be better 😂😉
Assemble as you like and enjoy. Bon Appetit! Xx
From https://www.mattygcooks.com/post/beetroot-brownie-cake
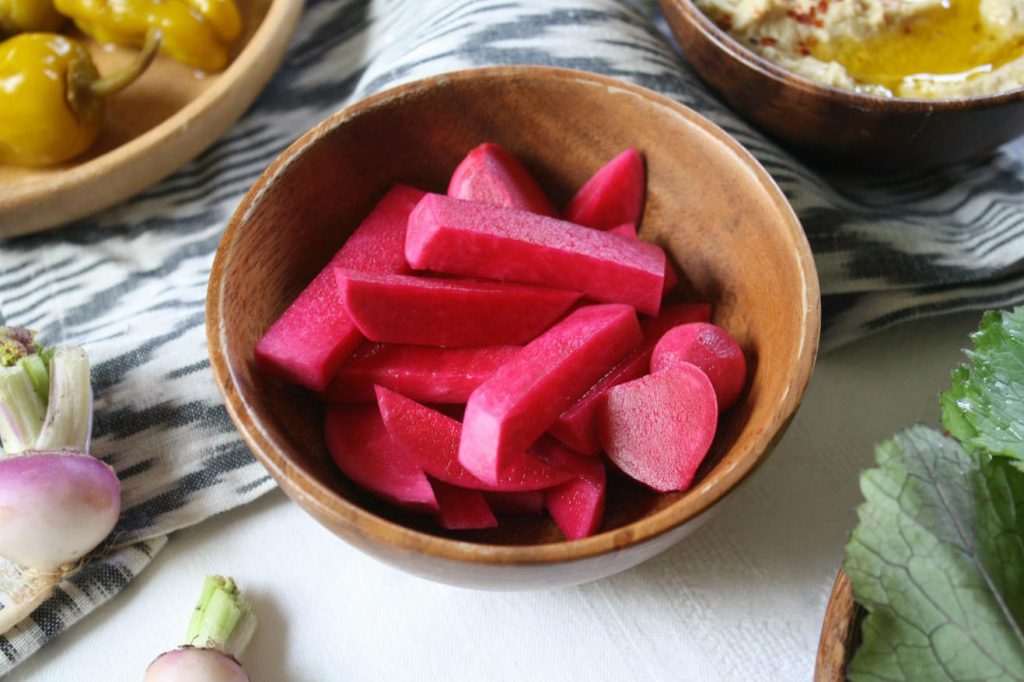
Rebecca’s Recipe of the Week: Pink Pickled Turnips (or Spanish Radish)
Dishes of pickled turnips often accompany the mezzes at a Middle Eastern restaurant (or, probably, a Middle Eastern meal). Salty and pink, they are easy to make at home. You can substitute those confusing giant Spanish black radishes for the turnips, if you still have some of these in your fridge. The lovely pink colour comes from beetroot.
The ratio of turnip to beetroot is approximate.
You can sterilise jars by placing clean washed jars in a 130C oven for 20 minutes. Switch the oven off and leave the jars inside until needed. Alternatively, pour boiling water over clean jars and leave until you’re ready to use them.
Pink Pickled Turnips
Ingredients
500ml water
3 tablespoons salt
1.5 kilos turnips or Spanish black radishes, or a mixture
250g beetroot
3-4 cloves of garlic
Handful of celery leaves
A few bay leaves (optional)
1 teaspoon whole peppercorns (optional)
2 cups white vinegar
Preparation
Boil the water and salt together for 5 minutes, then set aside to cool.
Peel the turnips or radishes, and the beetroot, and cut into wedges. (The size does not matter a great deal; cut them into the size you’d like to eat.) Peel the garlic and cut each clove in half.
Layer the turnips (or radishes) in sterilised jars, packing some garlic, celery leaves, and optional bay leaves and peppercorns in between each layer.
Combine the vinegar with the water-and-salt mixture and pour this over the vegetables. Poke the vegetables down with a spoon to ensure there are no air pockets and that the vegetables are fully submerged. Seal the jar—Sally Butcher recommends putting a layer of clingfilm over the top before sealing if you’re using a metal lid—and leave for at least 2 weeks and up to 6 months.
Recipe adapted from Sally Butcher, Veggistan: A Vegetable Lover’s Tour of the Middle East (2011).
Rob’s Recipe of the Week: Beets and onions, French style
We seem to have had a huge haul of beetroot this year, so I’ve been looking for recipes to make use of this. I tried this one last week, but my housemate had just moved out taking all the kitchen equipment with him so mine ended up a little strange with orange chunks instead of zest, and hand rolled pastry… It was still great though! I added a little wensleydale to offset the sweetness but leave this out and the recipe is vegan.
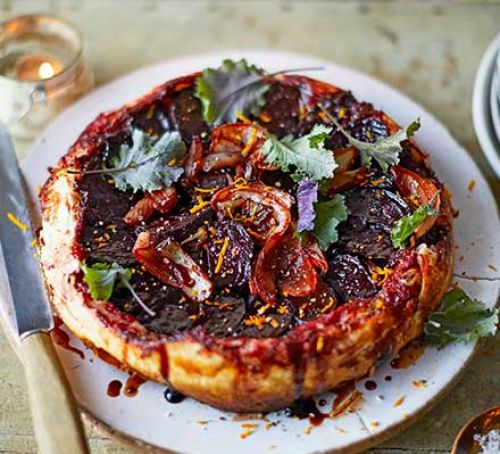
Beetroot & red onion tarte tatin
Ingredients:
400g beetroot, cut into wedges
1 red onion, cut into wedges
3 tbsp olive oil
2 tbsp rice wine vinegar
2 tbsp soft brown sugar
2 star anise
flour, for rolling
500g block puff pastry (there is a vegan Jus-Rol)
1 orange, zested
peppery green salad, to serve
Method:
Heat oven to 200C/180C fan/gas 6. In a bowl, toss the beetroot and onion in 2 tbsp of the oil, the vinegar and sugar. Add the star anise and season well. Heat the rest of the oil in a large, ovenproof non-stick frying pan (normal ceramic dish worked fine for me), then nestle in the veg so that they cover the surface of the pan. Cover with foil and cook in the oven for 45 mins.
On a well-floured surface, roll the pastry to a thickness of 0.5cm and cut out a circle the same size as your frying pan. Carefully take the pan out of the oven, remove the foil and wiggle the beets and onion around in the pan to make a compact layer. Put the pastry on top, tucking it in all around the edges, then return the pan to the oven and bake for 35 mins or until the pastry has puffed up and is a deep golden brown.
Slide a palate knife around the edge of the tart, then put a plate on top of the pastry, serving side down. Flip the pan over to turn the tart out onto the plate – be careful not to burn yourself with the handle. Top with the orange zest and a sprinkle of sea salt, then serve with a peppery salad on the side.
From https://www.bbcgoodfood.com/recipes/beetroot-red-onion-tarte-tatin

Rebecca’s Recipe of the Week: Three Salad Dressings for Kale or other Hearty Salad Greens
Several people have been asking for things to do with kale, pak choi, and other robust greens. Among other things you can make them into excellent salads. In all cases, it’s a good idea to manhandle the greens a bit to soften them up. Shred them fine and, using your hands, scrunch them up as hard as you can for a few minutes. Confronted with this vigorous treatment, they will become much softer and more tender. Pak choi does not need as much scrunching as kale or cabbage, but it will benefit from a bit body English.
Once you’ve scrunched your salad, you need an oomphy dressing to stand up to these greens. I thought I would offer a compilation of some of the salad dressings that I’d recommend to complement these hearty greens. All three are incredibly simple: you just whizz them up in a blender or mix them with a fork. And if you don’t mind doing your scrunching after you’ve dressed the salad, the tenderising effect will be even more noticeable. Once you’ve done that, you can add anything else you like: leftover boiled potatoes, toasted pumpkin seeds, shredded white or black radish, olives, chick peas….
(I was intending to present a fascinating but somewhat weird recipe for a beetroot-based vegan brownie, using a recipe I tore out of an Air France inflight magazine. Extensive testing on my colleagues at work led me to change my mind. The consensus was that the recipe must be part of a plot to denigrate vegans!)
Miso-Tahini Dressing
Serves 2
Ingredients
1 tablespoon miso paste
1 tablespoon tahini
1 tablespoon soya sauce
1 tablespoon cider vinegar
Preparation
Combine the ingredients and blend well, using a fork. Taste to see if it would benefit from a little more vinegar. The mahogany-dark dressing is now ready to use. This makes enough for half a small cabbage, shredded, together with several grated carrots. It is also good on other greens.
Spring Onion and Tahini Blanket
Enough to dress a large 2-person salad
Ingredients
4 spring onions, including the green bits
2 tablespoons tahini
2 tablespoons rapeseed oil
2 tablespoons lemon juice
2 tablespoons water
Salt and pepper, to taste
Preparation
Roughly chop the spring onions.
Place everything in a blender, Nutribullet, or the container for an immersion blender. Blend everything until smooth. Check to see if it needs more salt, pepper, or lemon juice. If it’s too thick for your liking you can add a little more water to thin it out, and then serve either as a salad dressing, or as a dip.
Super Turmeric Sauce
serves 2
Ingredients
2 tablespoons cashew butter
2 teaspoons Dijon mustard
juice of 3 clementines
2 inch piece of fresh turmeric, peeled
5 tbsp olive oil
Preparation
Combine the ingredients in a blender and whizz until smooth.
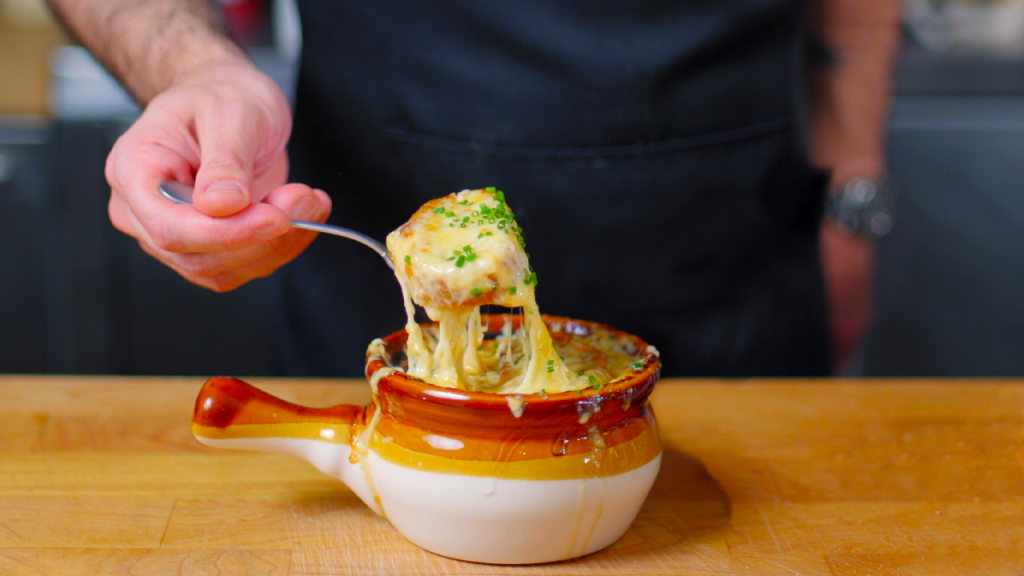
Rob’s Recipe of the Week: Onion Glut Soup
Last winter was my first at Canalside and followed an extremely hot and dry summer (with a poor onion harvest as a result of the dry conditions) which means I’ve been quite shocked at the number of onions in my share this winter – so much so that I have quite the pile accumulating at home. What better way is there to get through them than onion soup? The recipe is from another good youtube chef Binging with Babish (and is featured in Netflix’s The Chef Show S2E6) – see if you can spot his catchphrase “Let the flavours get to know each other” (although they have to do that a lot with onion soup!). I doubt beef stock is essential in this recipe so adapt it for a veggie/vegan diet as required.
Shopping List
For the soup:
1350g Onions (yields 4 servings)
6 cups high quality beef stock (or amped up store bought stock, see below) (or veggie stock)
2 Tbsp flour
Soy sauce (optional)
Fish sauce (optional)
Day old French baguette (for topping)
Gruyere cheese, shredded (for topping)
For Amped-Up Store Bought Stock
1 bunch parsley
Sliced carrots
Thyme sprigs
3 garlic cloves, halved
2 bay leaves
Sprinkle of peppercorns
2 cloves (optional)
Parmesan cheese rind
Method
Start by preparing your onions. Peel them and then cut in half from pole to pole – through the root and stem. Remove the tough root part by cutting it away with your knife. Then thinly slice them pole to pole – like cutting with the grain of the onion. This gives the slices more structural integrity so that they stand up to the slow cooking method.
Next prepare your stock. Ideally you would use homemade beef stock, but you can also “soup” up a store bought version. To do that, add your beef broth to a stock pot and bring to a simmer. Add aromatics like parsley, sliced carrots, thyme sprigs, garlic, bay leaves, peppercorns, cloves, and parmesan rind. Let it simmer for 1 hour.
In a large dutch oven (any large thick based pan) drizzle 2-4 Tbsp olive oil and let heat up for one minute. Dump in the sliced onions. It will look like way too many, but just trust me.
Slowly caramelize the onions over medium heat. Keep them moving constantly, and scrape down the sides of the pot. The onions are done when they are soft, jammy, and caramelized with a lot of fond on the bottom of the pot.
Add 2 Tbsp flour to the onions and cook for 1-2 minutes then deglaze the pot with 1 cup of dry sherry and cook, scraping up fond from the bottom of the pot.
Once the alcohol is cooked off, add the beef broth. Make sure to strain it first if you added aromatics.
Let the whole thing simmer for 5-10 minutes to let the flavors get to know each other. Optional: add umami boosters. I like to add a splash of fish sauce and soy sauce to richen the flavors.
Cut thick slices of day-old french baguette. Put them on a baking sheet. Drizzle with olive oil and top with salt and pepper. Toast bread in a 200°C oven for 5 minutes. Slice a clove of garlic in half and rub down each piece of bread with the garlic.
Check the soup for salt and pepper and season as necessary. Ladle soup into broiler-safe cups. Top with sliced baguette and shredded cheese. Put the bowls onto a baking sheet and put into an oven preheated to broil. Broil for 3-5 minutes until golden brown.
Garnish with chives and serve and enjoy!
From https://basicswithbabish.co/basicsepisodes/frenchonionsoup
Rebecca’s Recipe of the Week: Simple Salsify
Still got that salsify from a week or so ago hanging about in your fridge? These strange, shaggy parsnip-lookalikes have a mild, delicate flavour that is sometimes compared to oysters. Here is a simple way to prepare them. Serve them as a side in place of potatoes; they’re much lighter but very satisfying.
Salsify with Butter and Herbs
Ingredients
Salsify
Lemon juice
Butter
Fresh herbs, such as parsley, chives or dill, chopped
Salt and pepper
Preparation
Fill a bowl with cold water and add a tablespoon or so of lemon juice. This ‘acidulated water’ will stop the salsify from turning brown once it’s peeled. Bring a pot of water to the boil.
Peel the salsify and trim off the ends. As you proceed, drop the peeled parsnips into the acidulated water.
Drop the peeled salsify into the boiling water, turn down the heat a little, and simmer for 7-12 minutes, or until tender when pierced with a fork.
Drain and cut into 1-inch chunks. Dress with butter and herbs. Season to taste with salt and pepper and serve.
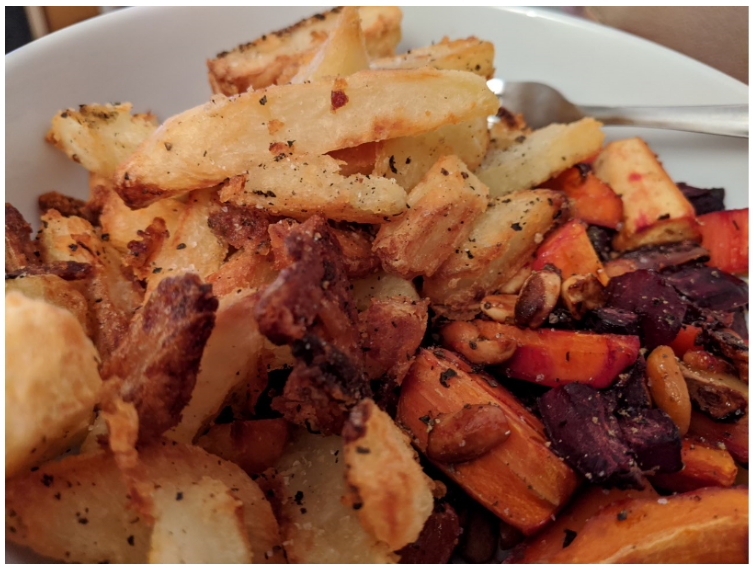
Rob’s Recipe of the Week: Perfect oven chips
This week I’ll keep it simple with one I’ve been saving up. My first winter at Canalside I felt almost overwhelmed by the number of potatoes I had to get through – there’s only so much mash one man can eat! That all changed when I worked out how to make good oven chips from scratch. Serve with whatever you want but for me there always has to be mayonnaise involved when it comes to oven chips…
Ingredients:
Potato (2-3 medium size per person)
Salt, pepper, oil
Method:
Put oven on about 220degC, put baking tray in to heat up with plenty of oil. Clean potatoes and peel if desired. Put kettle on to boil. Cut into 1.5cm thick slices, then lay these out and cut into chips. Next, boil the chips for about 4 minutes in a pan (par-boiling).
Drain potatoes and then put a lid on the pan and give a really good shake – this is key to rough up surface and make some crispy chips!
Get tray out of oven, and liberally salt and pepper, put chips on tray and apply more salt pepper and oil on top. Bake for about 20 minutes or until they look good to eat.
Variations: Add herbs/spices such as rosemary, thyme, fennel seeds, paprika (or any combination of). Patatas bravas: Same recipe but cut to 2cm chunks, add plenty of paprika when baking and serve with a pureed tomato sauce.
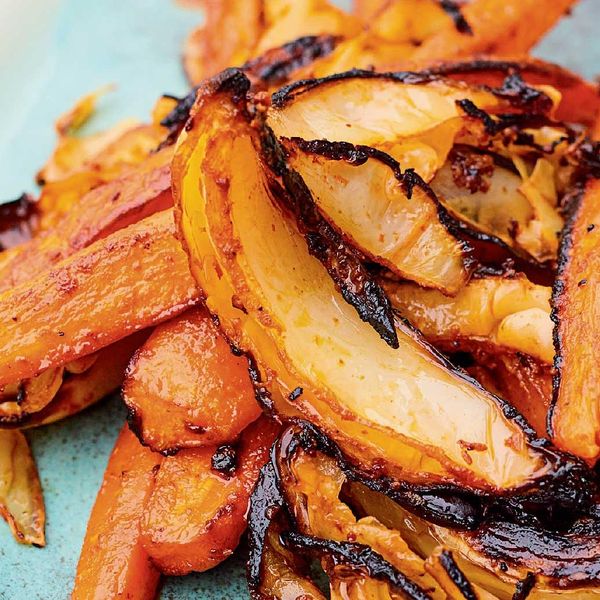
Rebecca’s Recipe of the Week: Meera Sodha’s Roasted Carrot and Cabbage with Korean Chile Paste
Gochujang, Korean chile paste, is warm and flavourful without being mouth-numbing. It adds a richness and complexity to roasted carrots and cabbage. The proportions of the two vegetables is not terribly important, and you might even want a bit more of the gochujang-cumin-ginger mixture. You could serve this with almost anything, from roast chicken to a potato pancake. It’s nice topped with yoghurt, too.
Roasted Carrot and Cabbage with Gochujang
Serves 2-4 as a side dish
Ingredients
750g carrots, peeled
750g white cabbage
3 tablespoons rapeseed oil
1.5 tablespoons gochujang paste
1 teaspoon ground cumin
1 teaspoon salt
4 cloves garlic, peeled and grated
3cm fresh ginger, peeled and grated
2 tablespoons more rapeseed oil
1 tablespoon white vinegar (I used rice wine vinegar; the original recipe calls for white wine vinegar)
Preparation
Preheat the oven to 220C. You will need two large baking trays and Meera Sodha recommends lining them with foil.
Cut the carrots lengthwise in half or quarters (depending on the size) to make long batons. Cut the cabbage into 2cm wedges. Place them in a large mixing bowl, or directly onto your two baking trays.
In a small bowl, mix the 3 tablespoons oil, gochujang, cumin, salt, garlic, and ginger. Pour over the vegetables and mix with your hands so that the marinade gets everywhere.
Spread the vegetables across the two trays. Make sure the carrots and cabbage are in a single layer, then bake for 35 to 40 minutes, until the vegetables are tender and blackened at the edges.
Meanwhile, put 2 tablespoons of oil and the vinegar into a large serving bowl. When the carrots and cabbage are roasted, transfer them to the bowl while still hot and toss them in the oil and vinegar and serve.
Recipe adapted from Meera Sodha, East (2019).
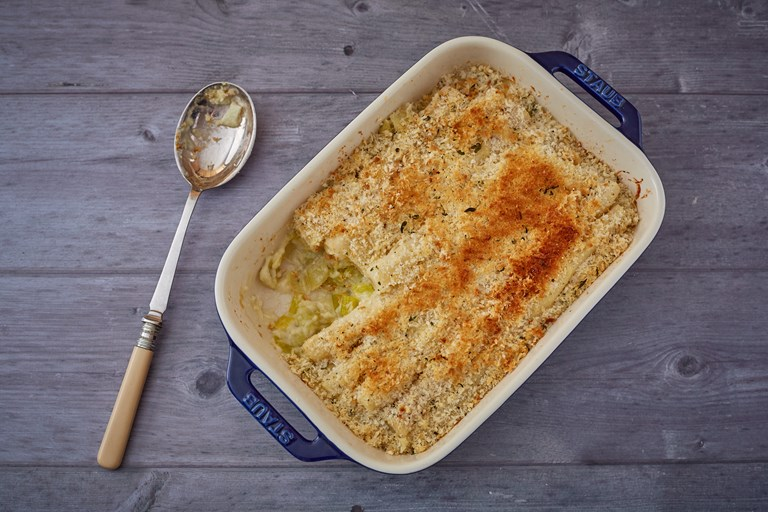
Rob’s Recipe of the Week: Victorian Salsify with Leeks
Salsify… I had no idea, but after a bit of googling and an interesting independent article / waitrose advert ( https://www.independent.co.uk/life-style/food-and-drink/salsify-root-vegetable-taste-recipe-what-is-it-waitrose-albert-bartlett-a8631251.html ) I’ve picked out a gratin recipe after realising that I’ve yet to make one this winter despite it being a weekly staple last year (that would be because I worked out how to make good oven chips instead!). I think this could be turned into a full meal rather than a side dish if you add sliced boiled potatoes and increase the quantities for the sauce and breadcrumbs.
Leek and Salsify Gratin
Ingredients
SALSIFY
400g of salsify root
Lemon juice & water in a bowl
300ml of milk
1 bay leaf
LEEKS
330g of leek, washed and sliced into 1cm rings
20g of butter
olive oil
2 garlic cloves, sliced
SAUCE
40g of butter
40g of flour
1/2 tsp Worcestershire sauce, (optional – omit to make vegetarian)
1 tsp Dijon mustard
Tabasco, to taste
100g of mature cheddar, grated
salt
freshly ground black pepper
CRUMB TOPPING
20g of Parmesan, (swap for vegetarian hard cheese if preferred)
20g of Panko breadcrumbs
freshly ground black pepper
Method
Wash the salsify, scrubbing off any soil, then peel and trim the ends of each baton. Immediately place the peeled salsify into the bowl of lemon water to stop it from going brown
Bring the milk to the boil in a pan with a bay leaf and add the salsify batons. Simmer for 6–8 minutes until cooked al dente, then drain and set aside (reserve the milk for later)
Heat a splash of olive oil in a pan with the butter and sauté the leeks and sliced garlic until soft but not coloured
In a separate pan, make the cheese sauce. Melt the butter then stir in the flour. Cook until golden and slightly foaming, then slowly whisk in the warm milk reserved from poaching the salsify, continuously whisking to prevent lumps
Stir in the grated cheddar. Once melted and smooth, season with the mustard, Worcestershire sauce (if using), Tabasco, salt and pepper
Preheat the oven to 180°C/gas mark 4
Trim the salsify to the size of the ovenproof dish you’ll be using. Roughly slice any trimmings and add to the pan with the leeks
Pour ¾ of the sauce into the leeks and stir to combine, then transfer to an ovenproof dish
Place the trimmed salsify into the remaining sauce and stir to coat. Neatly arrange the salsify on top of the leeks
Mix together the ingredients for the crumb and sprinkle evenly over the salsify. Bake for 25–30 minutes until golden and serve
Taken from: https://www.greatbritishchefs.com/recipes/leek-and-salsify-gratin-recipe