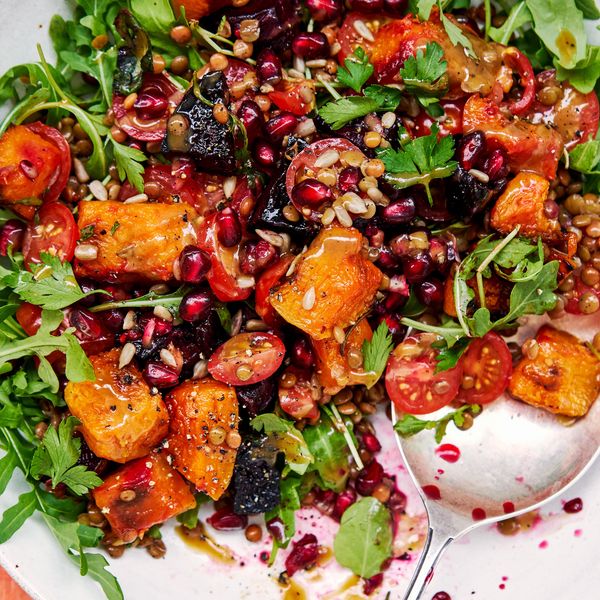
Rob’s Recipe of the Week: A ‘Harvesting Gap’ Salad
I tried a variation of this recipe tonight and it went down very well, it used a lot of Canalside produce and felt like an incredibly healthy meal! Feel free to adapt to what you have – I swapped the salad for boiled greens, the canned lentils for boiled red lentils and omitted the pomegranate seeds. I would be tempted to suggest some soy sauce on the lentils to cut through the sweetness of the other components (rocket probably does this job if you have it).
Roasted beets and squash with tahini
Ingredients:
2 large raw beetroots, peeled and chopped
1 medium squash, deseeded and chopped (no need to peel our squash)
Leaves from 2 rosemary sprigs, chopped
1 tbsp olive oil
1 tbsp maple syrup (I used honey)
1 × 400g tin brown lentils, drained and rinsed
200g mixed rocket and other salad leaves
200g cherry tomatoes, quartered
4 tbsp sunflower seeds
Handful fresh parsley, finely chopped
4 tbsp pomegranate seeds
Salt and black pepper
For the tahini vinaigrette:
3 tbsp extra-virgin olive oil
1 tbsp tahini
1 tsp maple syrup (I used golden syrup)
1 tsp Dijon mustard
1–2 tsp balsamic vinegar (to taste)
Method:
Preheat the oven to 200°C fan.
Place the beetroot, butternut squash and rosemary in a large baking tray or roasting tin and toss in the olive oil, maple syrup and some salt and pepper until evenly coated. Spread out the vegetables in a single layer and roast in the oven for 40–50 minutes, stirring once halfway through the cooking time, until tender and slightly crisp.
Meanwhile, combine all the ingredients for the tahini vinaigrette together in a bowl, seasoning to taste with salt and pepper.
Place the lentils and salad leaves in large bowl with the cherry tomatoes and a small drizzle of the tahini vinaigrette and toss until evenly coated.
Transfer the dressed salad to a serving dish and add the still-warm roast vegetables in layers with the sunflower seeds, parsley and pomegranate seeds. Finish with a generous drizzle of vinaigrette.
Adapted from: https://thehappyfoodie.co.uk/recipes/roasted-beets-and-butternut-squash-with-tahini
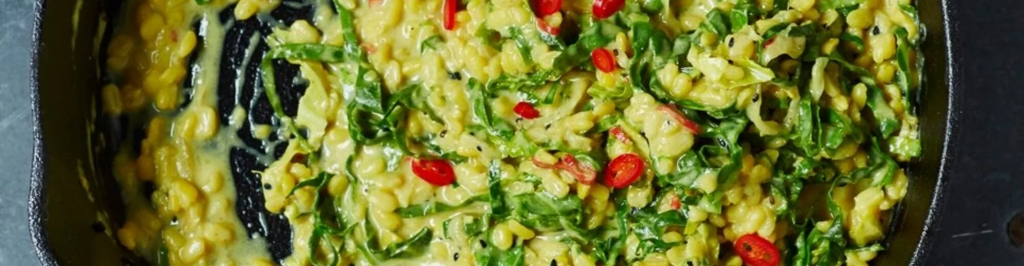
Rob’s Recipe of the Week: Spring Dal
We’re getting some huge spring greens at the moment and I’ve discovered a few new recipes involving them as a result. I make Dhal fairly regularly but rarely follow a recipe. This one is a really good introduction though, I was quite amazed at how rich it tasted and I’m really not sure what the difference was to my usual attempts! Make sure you cook until the lentils are soft, I’m often too impatient.
Spring Green and Coconut Dal
Ingredients (Serves two)
1 tbsp coconut oil
1 onion, finely sliced
1 large or 2 small garlic cloves, finely chopped, grated or crushed
4cm piece of fresh ginger, peeled and finely grated
1 red chilli, finely sliced
1 tsp black mustard seeds
¼ tsp ground turmeric
1 x 400ml tin coconut milk
100g yellow mung dal lentils, rinsed in a sieve (I used red lentils)
1 tsp coriander seeds, toasted and ground
1 tsp cumin seeds, toasted and ground
200g spring or summer greens, tough ribs removed (sliced them and fired with the onion), leaves finely shredded. Feel free to go heavy on the greens I found they worked well.
handful of coriander leaves
a squeeze of lime or lemon juice
toasted coconut chips or toasted desiccated coconut, to garnish
salt
Method
Prep time: 5 min
Cooking time: 50 min
Melt the coconut oil in a large pan. Add the onion and fry on a low heat for 10 minutes, stirring occasionally.
Turn up the heat a little and add the garlic, ginger, chilli, mustard seeds and turmeric. Stir for about 1 minute, until you hear the mustard seeds start to pop. Stir the coconut milk in the can then pour into the pan with the lentils and ground coriander and cumin. Fill the coconut milk can half full with water and add that too.
Bring up to the boil, reduce the heat and simmer for about 15 minutes. Add the greens, stirring in small handfuls at a time, then cook for a further 5–10 minutes, until the lentils are tender and the greens wilted. Keep an eye on the liquid and add more water if needed.
Season the dal with salt, stir in the fresh coriander and add a squeeze of lime or lemon juice to taste. Serve the dal prinkled with toasted coconut and a few extra coriander leaves.
Adapted from: https://www.riverford.co.uk/recipes/spring-green-and-coconut-dal
Rebecca’s Recipe of the Week: Gingery Green Noodles
This is another very fast dish of delicious slurpy noodles, spiked with basil, lime juice and sesame oil.
Ginger-Poached Noodles
Serves 2-3
Ingredients
4 cups vegetable broth (I used water with 2 tablespoons of white miso)
2 ounces fresh ginger, peeled and thinly sliced
8 ounces firm tofu or tempeh, cut into small cubes
approximately 2 cups of sprouting broccoli or shredded spring greens
4 ounces dried noodles of your choice (I used soba noodles)
1-2 tablespoons soya sauce
¼ cup fresh basil, shredded
¼ cup fresh mint, shredded
juice of half a lime
crushed red pepper flakes (I used part of a shredded Canalside chile)
toasted sesame oil
Preparation
Place the broth and ginger in a large saucepan and bring to a boil. Lower the heat, and simmer gently for ten minutes or so. Meanwhile, bring some water to the boil to cook the noodles.
Cook the noodles in the boiling water until they are tender, drain them, and set them aside.
After the broth has simmered for ten minutes add the and tofu or tempeh and the greens. Return to a boil, and then turn the heat back down to a simmer and cook for 5-8 minutes, or until the greens are tender.
Add the drained pasta to the broth and heat for a few more minutes, stirring regularly. Stir in the soya sauce, basil, mint, and lime juice. Before serving, if you have the energy you can fish out the slices of ginger, which are perfectly edible but a bit chewy.
Serve in bowls with a few pinches of crushed red pepper flakes, and a drizzle of sesame oil, to taste.
Recipe adapted from 101 Cookbooks.
Erica’s Recipe of the Week: Sweet, rich and sour Indian vegetable stew
Thanks to Erica Moody for suggesting this recipe from Meera Sodha’s column in last week’s Guardian Food.
Meera says: There might seem to be a lot of chillies in this, but it’s not a hot dish, because the natural sweetness of the squash and sweetcorn, combined with the rich coconut milk and spiky lime, balance things out. Fresh curry leaves are now sold in most major supermarkets.
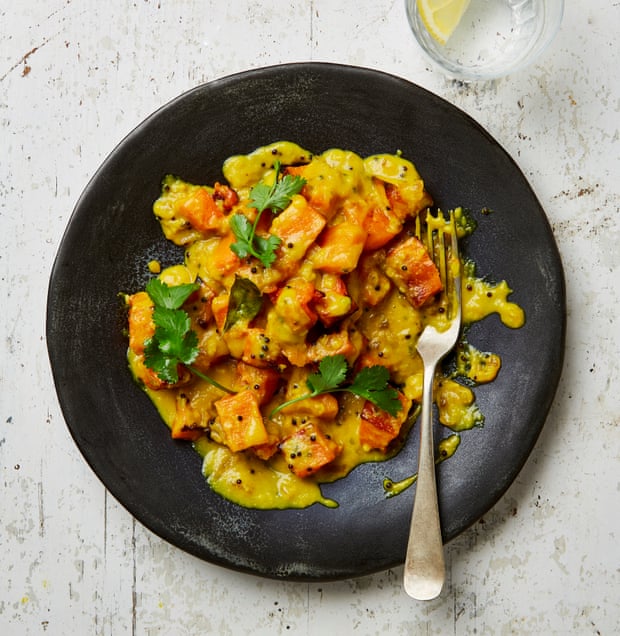
Butternut squash and sweetcorn erriseri
Prep 10 min
Cook 45 min
Serves 4
Ingredients:
1kg squash, washed
Sunflower oil
Fine sea salt
1 x 340g tin sweetcorn, drained
2 tsp black mustard seeds
12 curry leaves
1 large onion, peeled and finely chopped
4 garlic cloves, peeled and minced
3 green finger chillies, finely chopped
2 tsp turmeric
1 x 400ml tin coconut milk
2 tbsp fresh lemon juice (ie, from 1 lemon)
Coriander leaves, to garnish
Method:
Cut the squash in half (no need to peel), scoop out and discard the seeds, then cut it into 2cm cubes. Heat the oven to 200C (180C fan)/gas 6. Tip the squash pieces on to an oven tray, pour over two tablespoons of oil and a good sprinkling of salt, and toss to coat. Bake for 25-30 minutes, until the squash chunks are tender and their edges caramelised.
Add two tablespoons of water to the drained sweetcorn kernels and blend to a smooth paste (I use a stick blender).
In a large frying pan, heat two tablespoons of oil and, when hot, add the mustard seeds and curry leaves, and leave them to crackle and pop for a minute. Now add the onion and cook, stirring occasionally, for about 10 minutes, until translucent and turning golden, then add the garlic and chillies, and cook for two minutes. Stir in the sweetcorn paste, turmeric and a teaspoon and a half of salt, cook for a minute, then add the coconut milk (keep the tin) and whisk so everything is combined and the curry sauce is a vibrant yellow.
Half-fill the coconut milk tin with water and add to the pot to loosen the curry – you may need a little more or less water than this, depending on the thickness of your coconut milk – bring to a boil and simmer for five minutes, until it starts to thicken. Stir in the roast squash and lemon juice, and check the seasoning. Garnish with coriander and serve immediately.
Adapted from Guardian Food, 20th March 2020
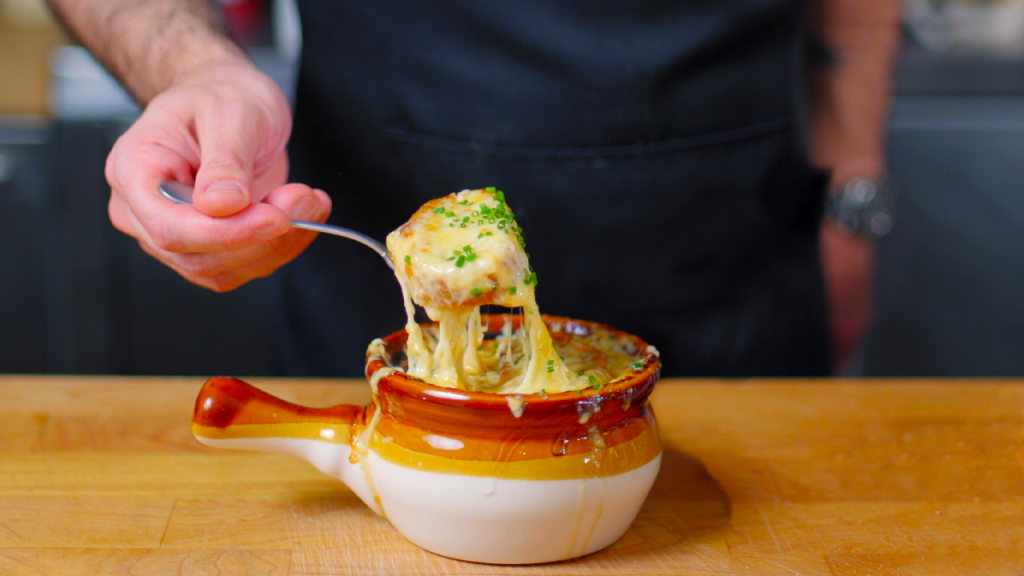
Rob’s Recipe of the Week: Onion Glut Soup
Last winter was my first at Canalside and followed an extremely hot and dry summer (with a poor onion harvest as a result of the dry conditions) which means I’ve been quite shocked at the number of onions in my share this winter – so much so that I have quite the pile accumulating at home. What better way is there to get through them than onion soup? The recipe is from another good youtube chef Binging with Babish (and is featured in Netflix’s The Chef Show S2E6) – see if you can spot his catchphrase “Let the flavours get to know each other” (although they have to do that a lot with onion soup!). I doubt beef stock is essential in this recipe so adapt it for a veggie/vegan diet as required.
Shopping List
For the soup:
1350g Onions (yields 4 servings)
6 cups high quality beef stock (or amped up store bought stock, see below) (or veggie stock)
2 Tbsp flour
Soy sauce (optional)
Fish sauce (optional)
Day old French baguette (for topping)
Gruyere cheese, shredded (for topping)
For Amped-Up Store Bought Stock
1 bunch parsley
Sliced carrots
Thyme sprigs
3 garlic cloves, halved
2 bay leaves
Sprinkle of peppercorns
2 cloves (optional)
Parmesan cheese rind
Method
Start by preparing your onions. Peel them and then cut in half from pole to pole – through the root and stem. Remove the tough root part by cutting it away with your knife. Then thinly slice them pole to pole – like cutting with the grain of the onion. This gives the slices more structural integrity so that they stand up to the slow cooking method.
Next prepare your stock. Ideally you would use homemade beef stock, but you can also “soup” up a store bought version. To do that, add your beef broth to a stock pot and bring to a simmer. Add aromatics like parsley, sliced carrots, thyme sprigs, garlic, bay leaves, peppercorns, cloves, and parmesan rind. Let it simmer for 1 hour.
In a large dutch oven (any large thick based pan) drizzle 2-4 Tbsp olive oil and let heat up for one minute. Dump in the sliced onions. It will look like way too many, but just trust me.
Slowly caramelize the onions over medium heat. Keep them moving constantly, and scrape down the sides of the pot. The onions are done when they are soft, jammy, and caramelized with a lot of fond on the bottom of the pot.
Add 2 Tbsp flour to the onions and cook for 1-2 minutes then deglaze the pot with 1 cup of dry sherry and cook, scraping up fond from the bottom of the pot.
Once the alcohol is cooked off, add the beef broth. Make sure to strain it first if you added aromatics.
Let the whole thing simmer for 5-10 minutes to let the flavors get to know each other. Optional: add umami boosters. I like to add a splash of fish sauce and soy sauce to richen the flavors.
Cut thick slices of day-old french baguette. Put them on a baking sheet. Drizzle with olive oil and top with salt and pepper. Toast bread in a 200°C oven for 5 minutes. Slice a clove of garlic in half and rub down each piece of bread with the garlic.
Check the soup for salt and pepper and season as necessary. Ladle soup into broiler-safe cups. Top with sliced baguette and shredded cheese. Put the bowls onto a baking sheet and put into an oven preheated to broil. Broil for 3-5 minutes until golden brown.
Garnish with chives and serve and enjoy!
From https://basicswithbabish.co/basicsepisodes/frenchonionsoup
Rebecca’s Recipe of the Week: Simple Salsify
Still got that salsify from a week or so ago hanging about in your fridge? These strange, shaggy parsnip-lookalikes have a mild, delicate flavour that is sometimes compared to oysters. Here is a simple way to prepare them. Serve them as a side in place of potatoes; they’re much lighter but very satisfying.
Salsify with Butter and Herbs
Ingredients
Salsify
Lemon juice
Butter
Fresh herbs, such as parsley, chives or dill, chopped
Salt and pepper
Preparation
Fill a bowl with cold water and add a tablespoon or so of lemon juice. This ‘acidulated water’ will stop the salsify from turning brown once it’s peeled. Bring a pot of water to the boil.
Peel the salsify and trim off the ends. As you proceed, drop the peeled parsnips into the acidulated water.
Drop the peeled salsify into the boiling water, turn down the heat a little, and simmer for 7-12 minutes, or until tender when pierced with a fork.
Drain and cut into 1-inch chunks. Dress with butter and herbs. Season to taste with salt and pepper and serve.
Rob’s Recipe of the Week: Balsamic Brussel Sprouts
It seems like every sprouts recipe in existence starts with “sprouts are now one of my favourite christmas foods…” but however cliche it is, I agree since I started experimenting with different ideas. In past years I’ve used Jamie Oliver’s squashed brussels recipe but this year I want to keep it veggie so I’ve gone for the recipe below. I might experiment with boiling, frying and squashing the sprouts before the roast as per the Jamie recipe though.
Maple Balsamic Sprouts
Ingredients:
4 cups (350g) Brussels sprouts, halved
2 tablespoons olive oil
1/2 red onion, thinly sliced
2-3 garlic cloves, minced
1 teaspoon dried rosemary
salt and pepper, to taste
1/3 cup (40g) hazelnuts, roasted chopped
Maple Balsamic Glaze
3 tablespoons balsamic vinegar
2 teaspoon maple syrup
Instructions
Preheat the oven to 220 C
Wash and half the Brussels Sprouts and toss them with oil, onions, garlic, rosemary, salt, and pepper. Spread onto a baking sheet in a single layer and bake for about 30 minutes, stirring occasionally, until browned on the outside and tender on the inside.
Stir together balsamic vinegar and maple syrup and set aside.
Remove from oven and toss with hazelnuts and maple balsamic glaze.
Serve warm.
Taken from: https://www.mydarlingvegan.com/maple-balsamic-brussels-sprouts-with-hazelnuts-and-rosemary/
Rob’s Recipe of the Week: Crispy artichokes
I don’t think I’ve ever eaten a Jerusalem Artichoke before, but they’re coming in the share next week! After a bit of searching around it seems like roasting is the most common way to eat them and this recipe sounds like a good introduction. Anyone who’s had them before please feel free to suggest other ideas!

Ingredients (scalable)
- 800g Jerusalem artichokes
- 1 garlic bulb, cut down the middle
- 1 tbsp rosemary leaves, chopped
- 3 tbsp rapeseed (or other) oil
- pinch ground mace (Comes from nutmeg shells, so I will probably just substitute nutmeg)
- 20g butter
- 2 tsp lemon juice
Method
Heat oven to 180C/160C fan/gas 4. Soak the artichokes in cold water for 20 mins or so to loosen any dirt, then scrub them with a scourer, being sure to remove any grit. Halve the small ones and quarter the bigger ones, and put them in a roasting tin with the split garlic bulb and rosemary. Coat everything with the oil and season. Roast for 45-50 mins until tender inside and crispy outside.
To finish, squeeze the softened garlic cloves from their skins and toss with the roasted artichokes, along with the mace, butter and lemon juice.
Taken from https://www.bbcgoodfood.com/recipes/crispy-jerusalem-artichokes-roasted-garlic-rosemary
Rebecca’s Recipe of the Week: In Praise of Potatoes
In honour of the recent potato harvest, here is a splendid Nepalese potato salad from the Idaho Potato Commission. The Andean potato probably reached Nepal some time in the 1700s; it is now become a staple. In 2017 the country harvested 2,691,037 tonnes. This salad combines potatoes, fresh coriander, and spiced yoghurt to create a complex and satisfying dish. Eat with shredded carrot salad, and perhaps some flatbread.
The Potato Commission thinks this will serve 4 people, but we ate most of it in one sitting. ‘This is scrum’ declared Matt.

Chukauni: Nepalese Potato Salad
Ingredients
700g potatoes
1 cup frozen peas
½ cup red onion, finely chopped
½ cup fresh coriander, finely chopped
1 cup yoghurt, plus additional yoghurt, to serve
1 teaspoon salt
2 tablespoons rapeseed or vegetable oil
1 tablespoon coriander seeds
1 teaspoon cumin seeds
1 teaspoon fenugreek seeds
½ Canalside chile, finely chopped, seeds removed if desired
½ teaspoon turmeric
Preparation
Place the potatoes in a pot of cold water and bring slowly to the boil. Cook over very low heat until tender. Fish out the potatoes, drain, and set aside, keeping the water in the pan. Turn off the heat and then tip the peas into the hot water. Leave them there for 60 seconds and then drain them as well.
Once the potatoes are cool enough to handle, cut them into 2cm cubes.
Combine the peas, red onion, coriander, yoghurt and salt in a serving bowl. Stir and add the potatoes.
Heat the oil in a frying pan over medium-high heat. Once it is hot add the coriander, cumin and fenugreek seeds. Let sizzle for about 30 seconds, until they turn reddish brown. Remove from the heat and add the chile and turmeric. Toss so that the oil turns a sunny yellow.
Pour the oil–but not the seeds—over the salad. Keep as many seeds as possible back in the pan. Mix the oil into the salad and taste.
Now you have a choice: if the salad strikes you as perfectly delicious as it is, then you’re done. Serve and enjoy, with additional yoghurt on the side if you like.
If you think it needs a little more oomph, then scrape the seeds into a mortar and pestle and grind them until they’re a coarse powder. Sprinkle some or all of this into the salad, tasting as you go along. Once you’re pleased with the result, serve and enjoy.
Recipe adapted from the Idaho Potato Commission.
Rob’s Recipe of the Week: Road trip pasta
This week I’m keeping it simple and taking a little inspiration from a recent roadtrip to Italy. The spinach and tomato are pretty core to the dish but feel free to pick and choose from the rest of the list depending what you’ve got – I use an app called plant jammer to figure out what things might go well together.
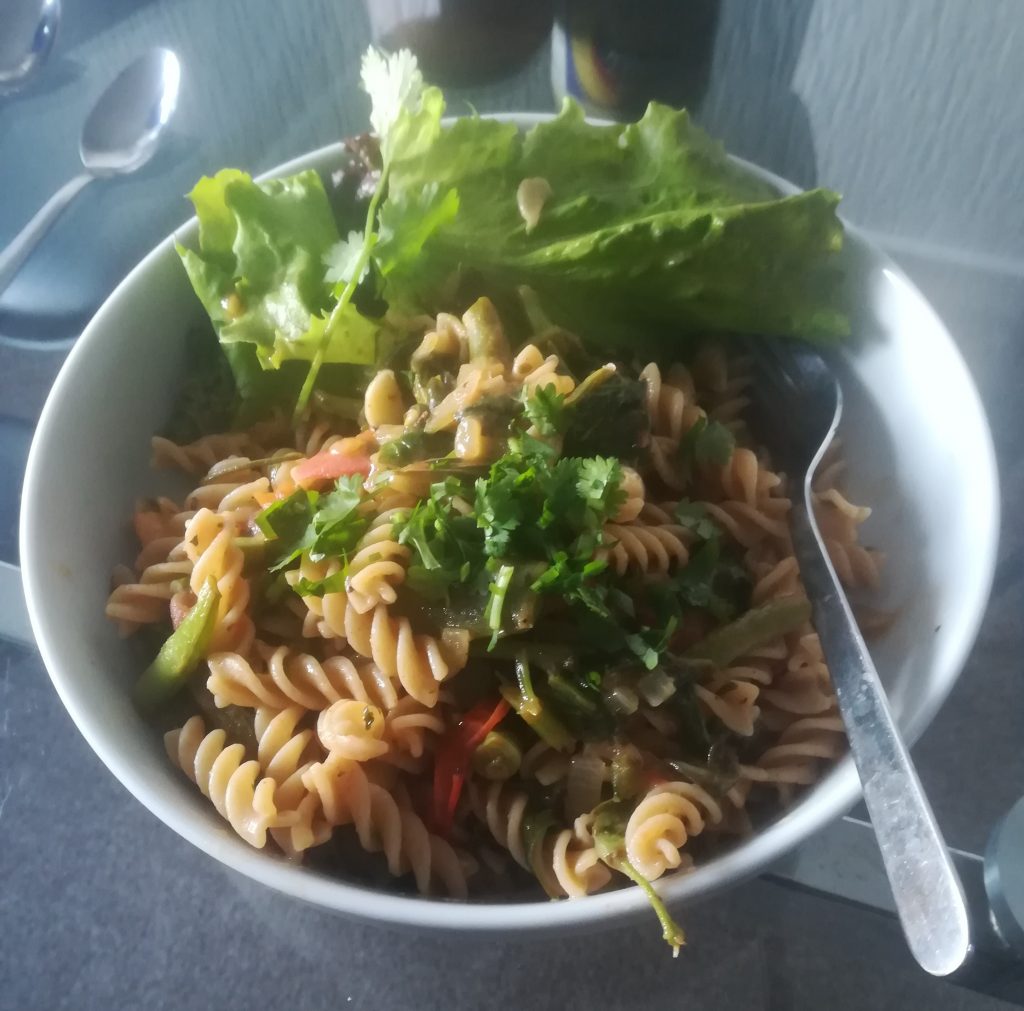
Core Ingredients (for 1 person):
Pasta of your choice, 2 handfuls
Fresh Tomatoes, 1 large handful
Spinach (or other greens depending on share), 3 handfuls
Basil, small handful
Garlic, 1 clove
Lemon Juice 0.5-1 tablespoon or to taste
Olive Oil, 2-3 tablespoons or to taste
Mixed herbs, 1 teaspoon
Optional extras:
Black olives, small handful
Walnuts, small handful
Onion, 1 medium
Green/French Beans, about 3cm bundle
Method:
First chop all your veg; tomatoes into quarters, spinach may need stems chopping down to manageable size, garlic minced or thin slices, onion diced
Next get the pasta on the boil – when it’s ready remember to keep the water!
Whilst the pasta cooks, fry off onion and garlic, then add tomatoes, spinach and any optional extras and fry at a medium heat.
The pasta should be ready about the same time as the veg is cooked. Before draining, add the olive oil to the veg and then add a few sloshes of the pasta water – the starch helps make a good sauce! Then add the lemon juice, basil and mixed herbs and stir it all together until you have a nice shiny consistent sauce. Season with salt and pepper.
Drain the Pasta and add to the pan, mix and serve with some salad on the side and a little chopped coriander on top.