2023: April news – The Spring Glut!
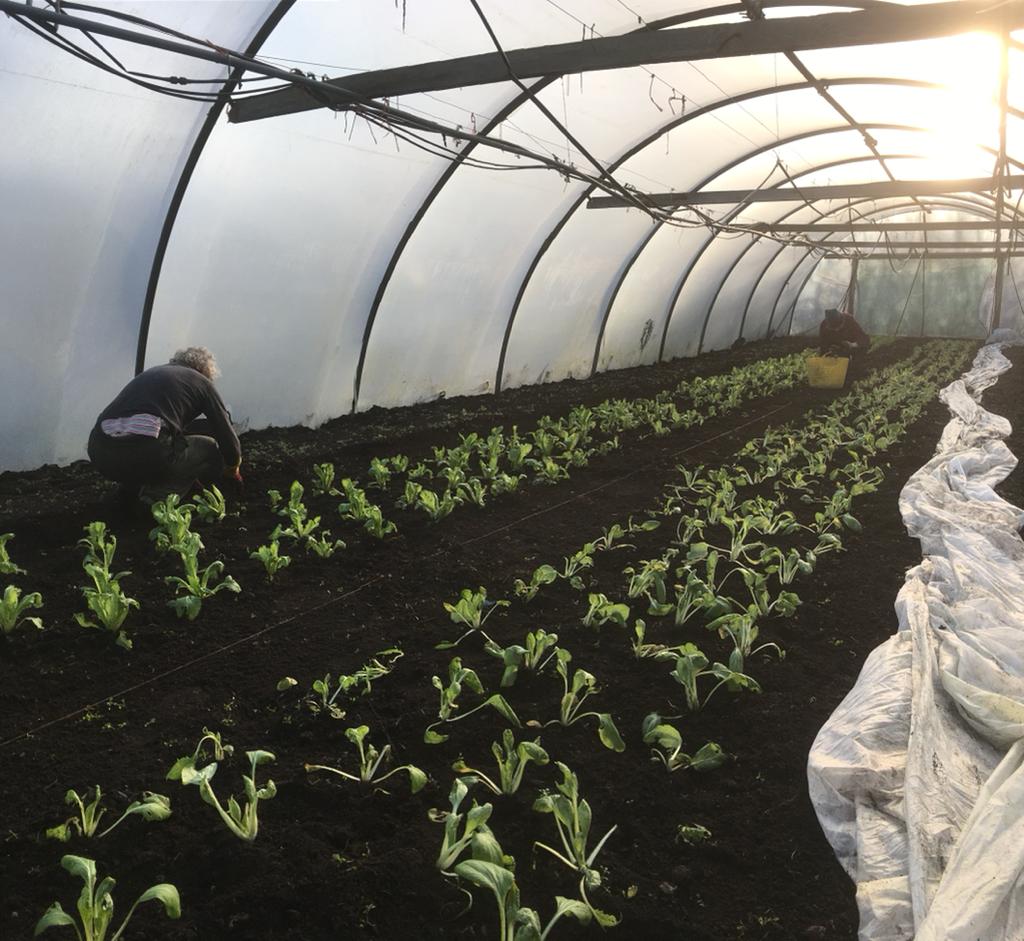
It’s been very heartening in the last couple of weeks to be harvesting an abundance of fresh greens again alongside seeing our polytunnels bursting to life. There’s nothing quite like the green of new growth to lift the spirits and we’re now into our spring glut which is always a welcome addition to the root vegetables that have seen us so well through the winter.
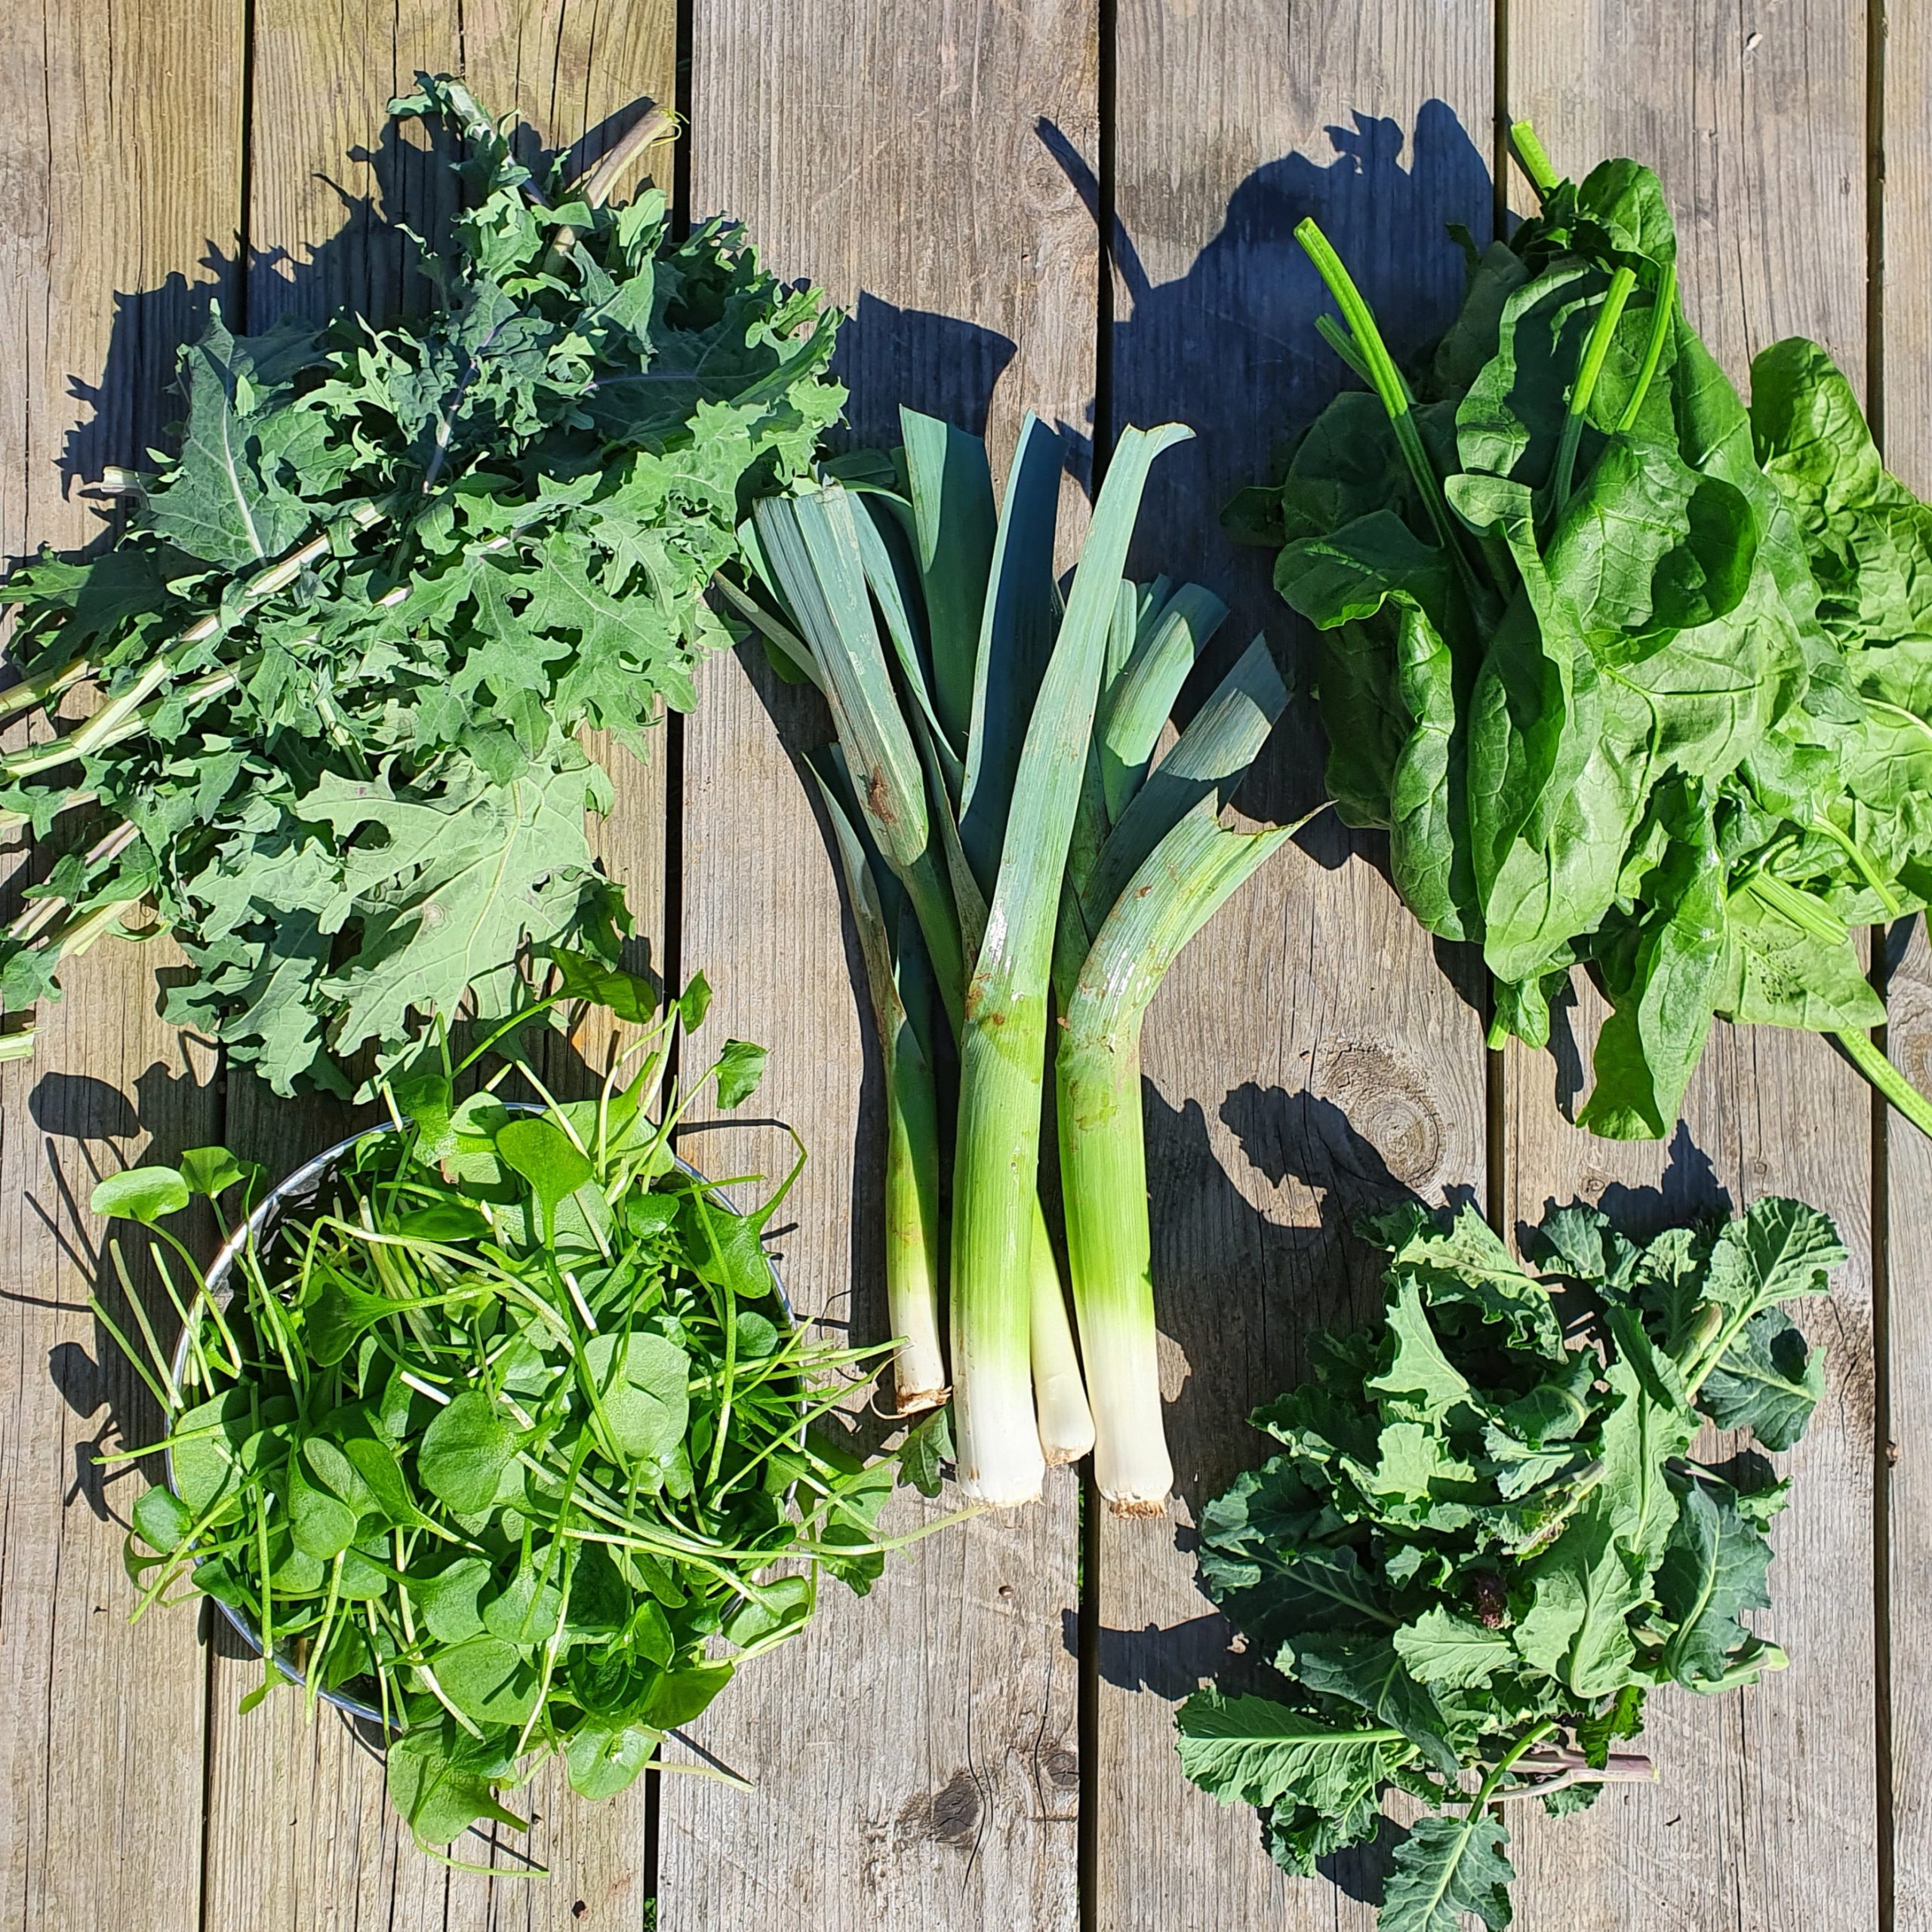

We bring you as many greens as are possible to grow locally and seasonally during the winter, thanks to a good crop rotation and our polytunnels. We overwinter certain plants like spring greens, kale, salads, spinach, spring onions, chard and more which means they get planted in the autumn, grow slowly over winter where we harvest occasionally but as soon as there is more light and heat we can get them in the share more abundantly. As we’ve been banging on about for months, there were crops that really suffered this year – brassica greens that would normally supplement the roots all winter like oriental salads, cauliflowers, purple sprouting broccoli and cabbages were massacred in the frosts so we have been working hard to eke out what we can. I don’t think we’ve actually had one week all winter where there’s been nothing green in the share which is to be celebrated more than ever this season. We were so happy to get some caulis and cabbages to everyone despite them being on the small size, and now our later variety of PSB is finally harvestable.

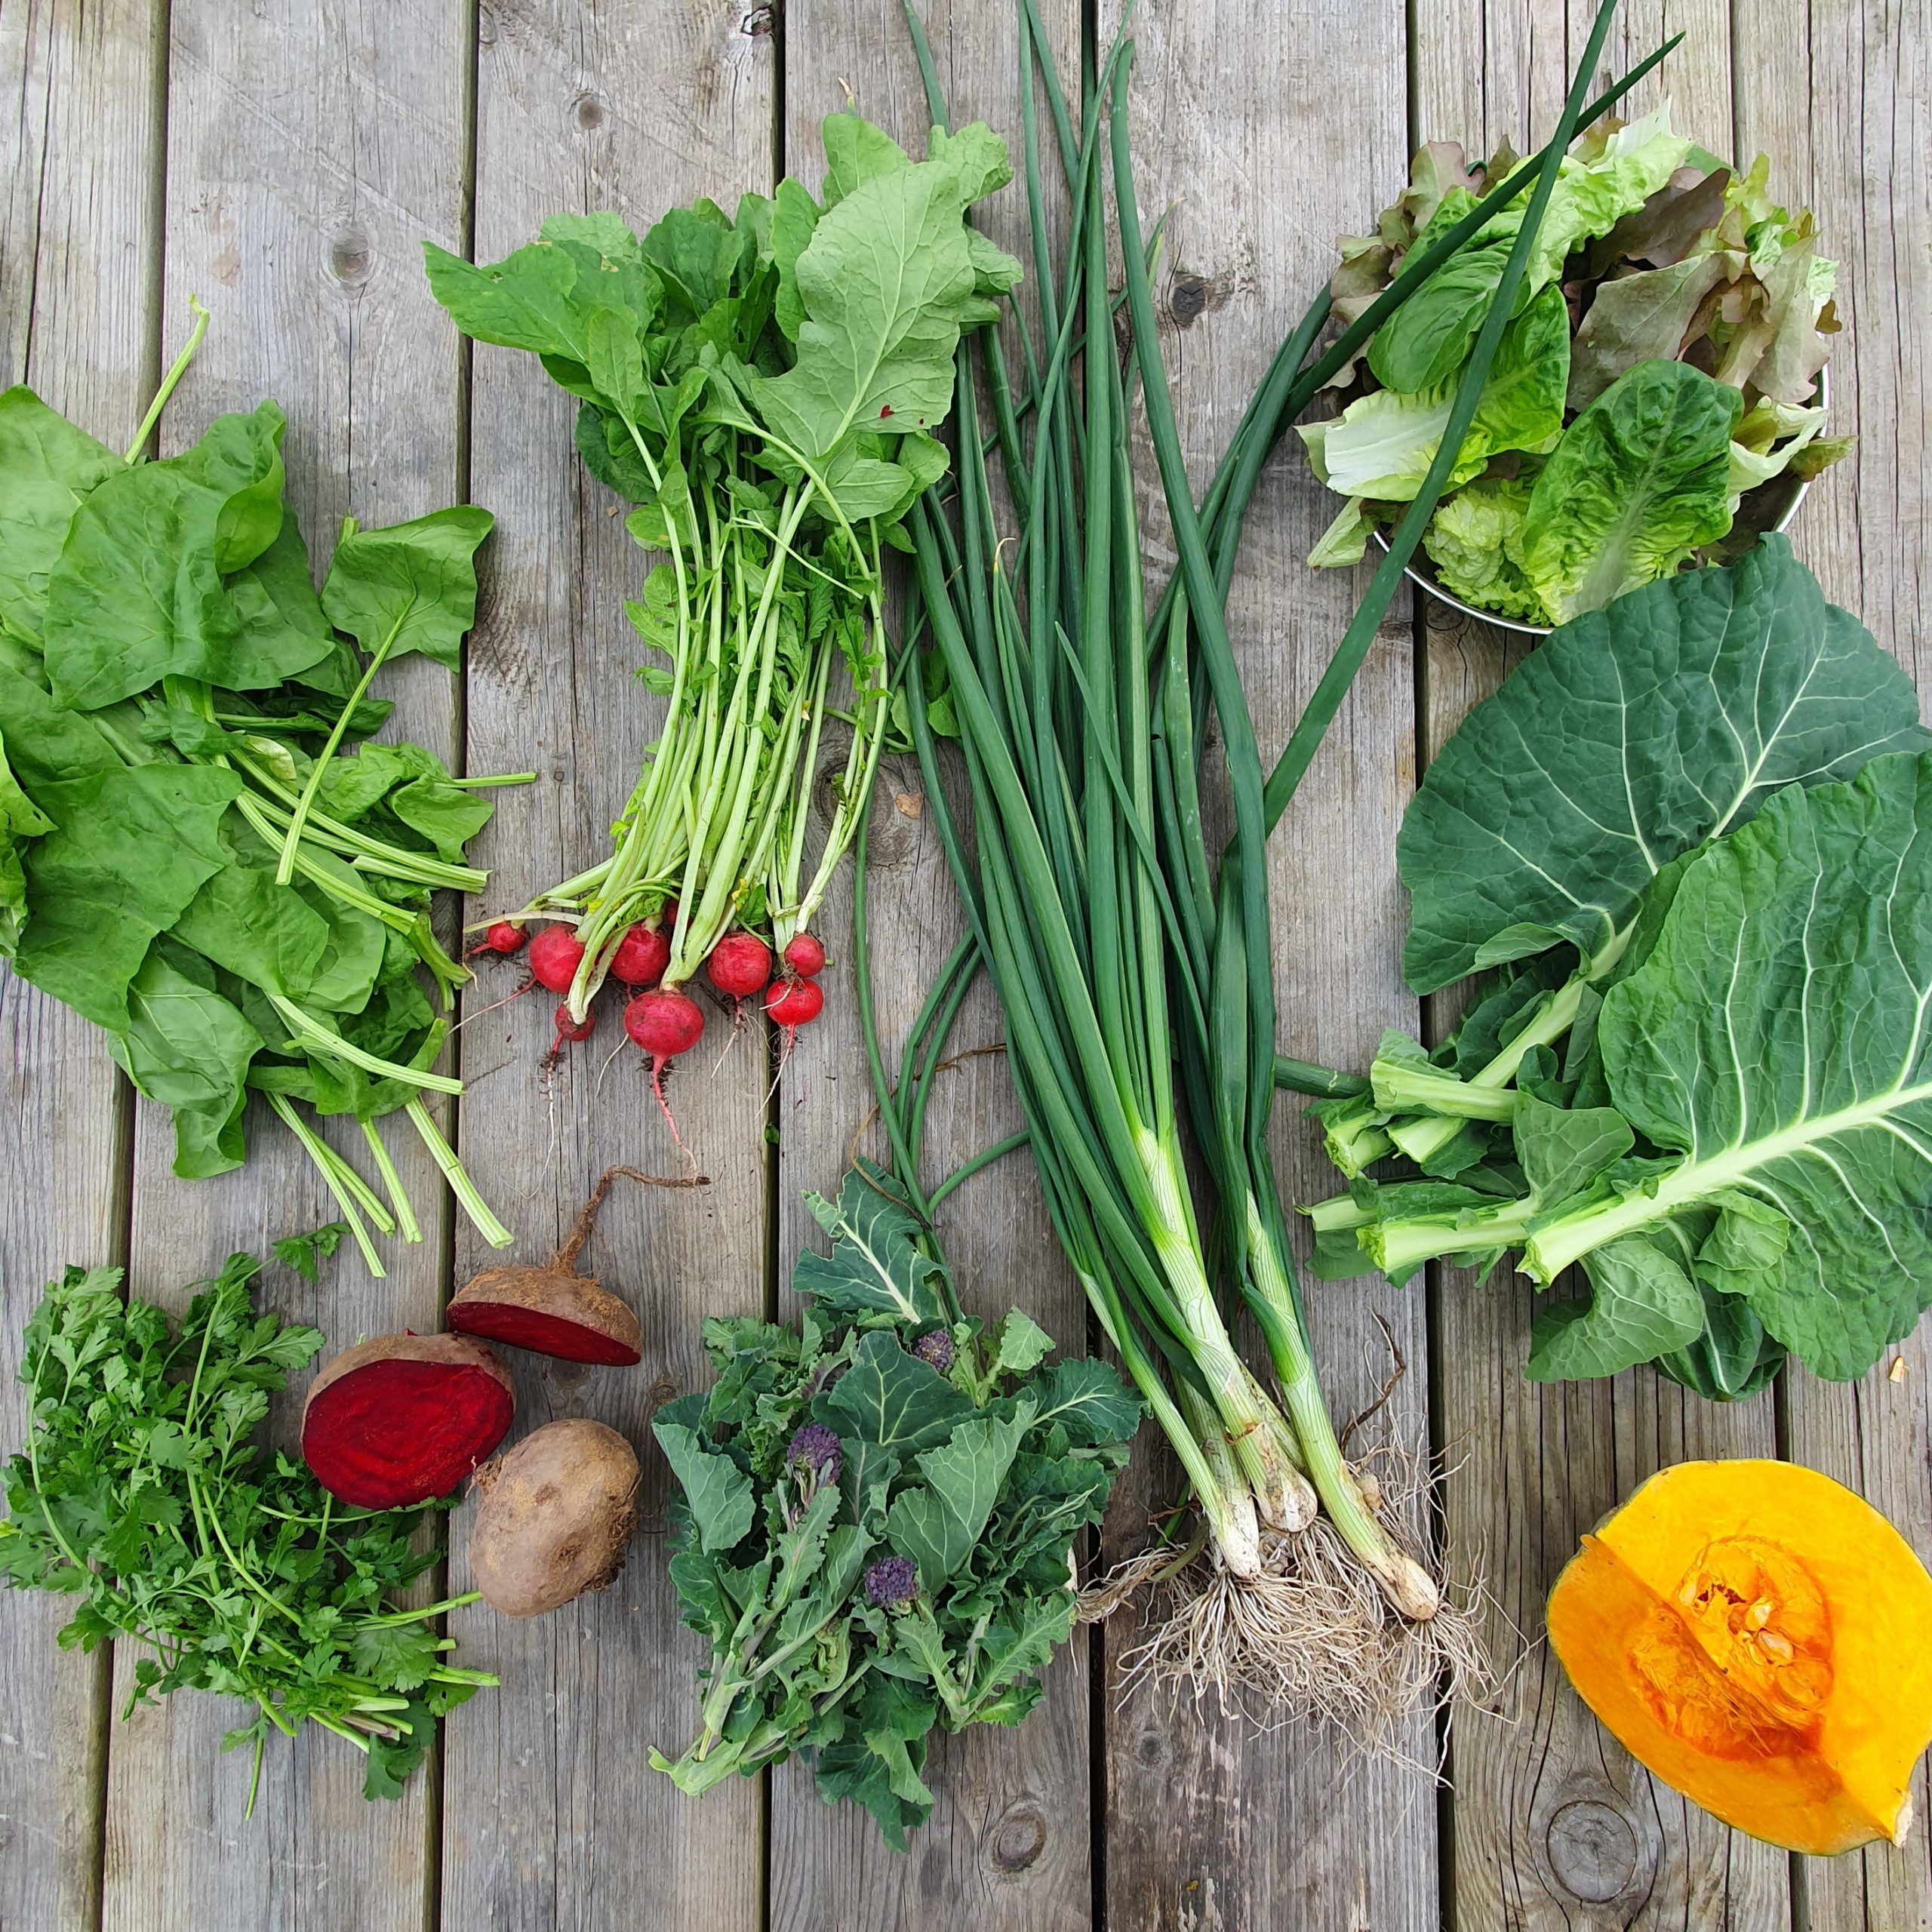
And in celebrating the greens, I also want to give a shout out to the roots that have seen us through the winter so well. I’ve noticed how easy it is to bemoan our root veg as we have become so accustomed in our culture to having whatever we want whenever we want. There would have been a time when the root veg was all that was available during the winter. For the winter share and beyond we always grow potatoes, carrots, parsnips, swedes, squash, celeriac, red and golden beetroot and jerusalem artichokes alongside a steady supply of alliums, which when you list it all together it’s actually quite diverse and nutritionally rich.
So all that being said, we hope you enjoy the last weeks of these roots, alongside the abundance of the spring glut!
Eleanor, on behalf of the growers
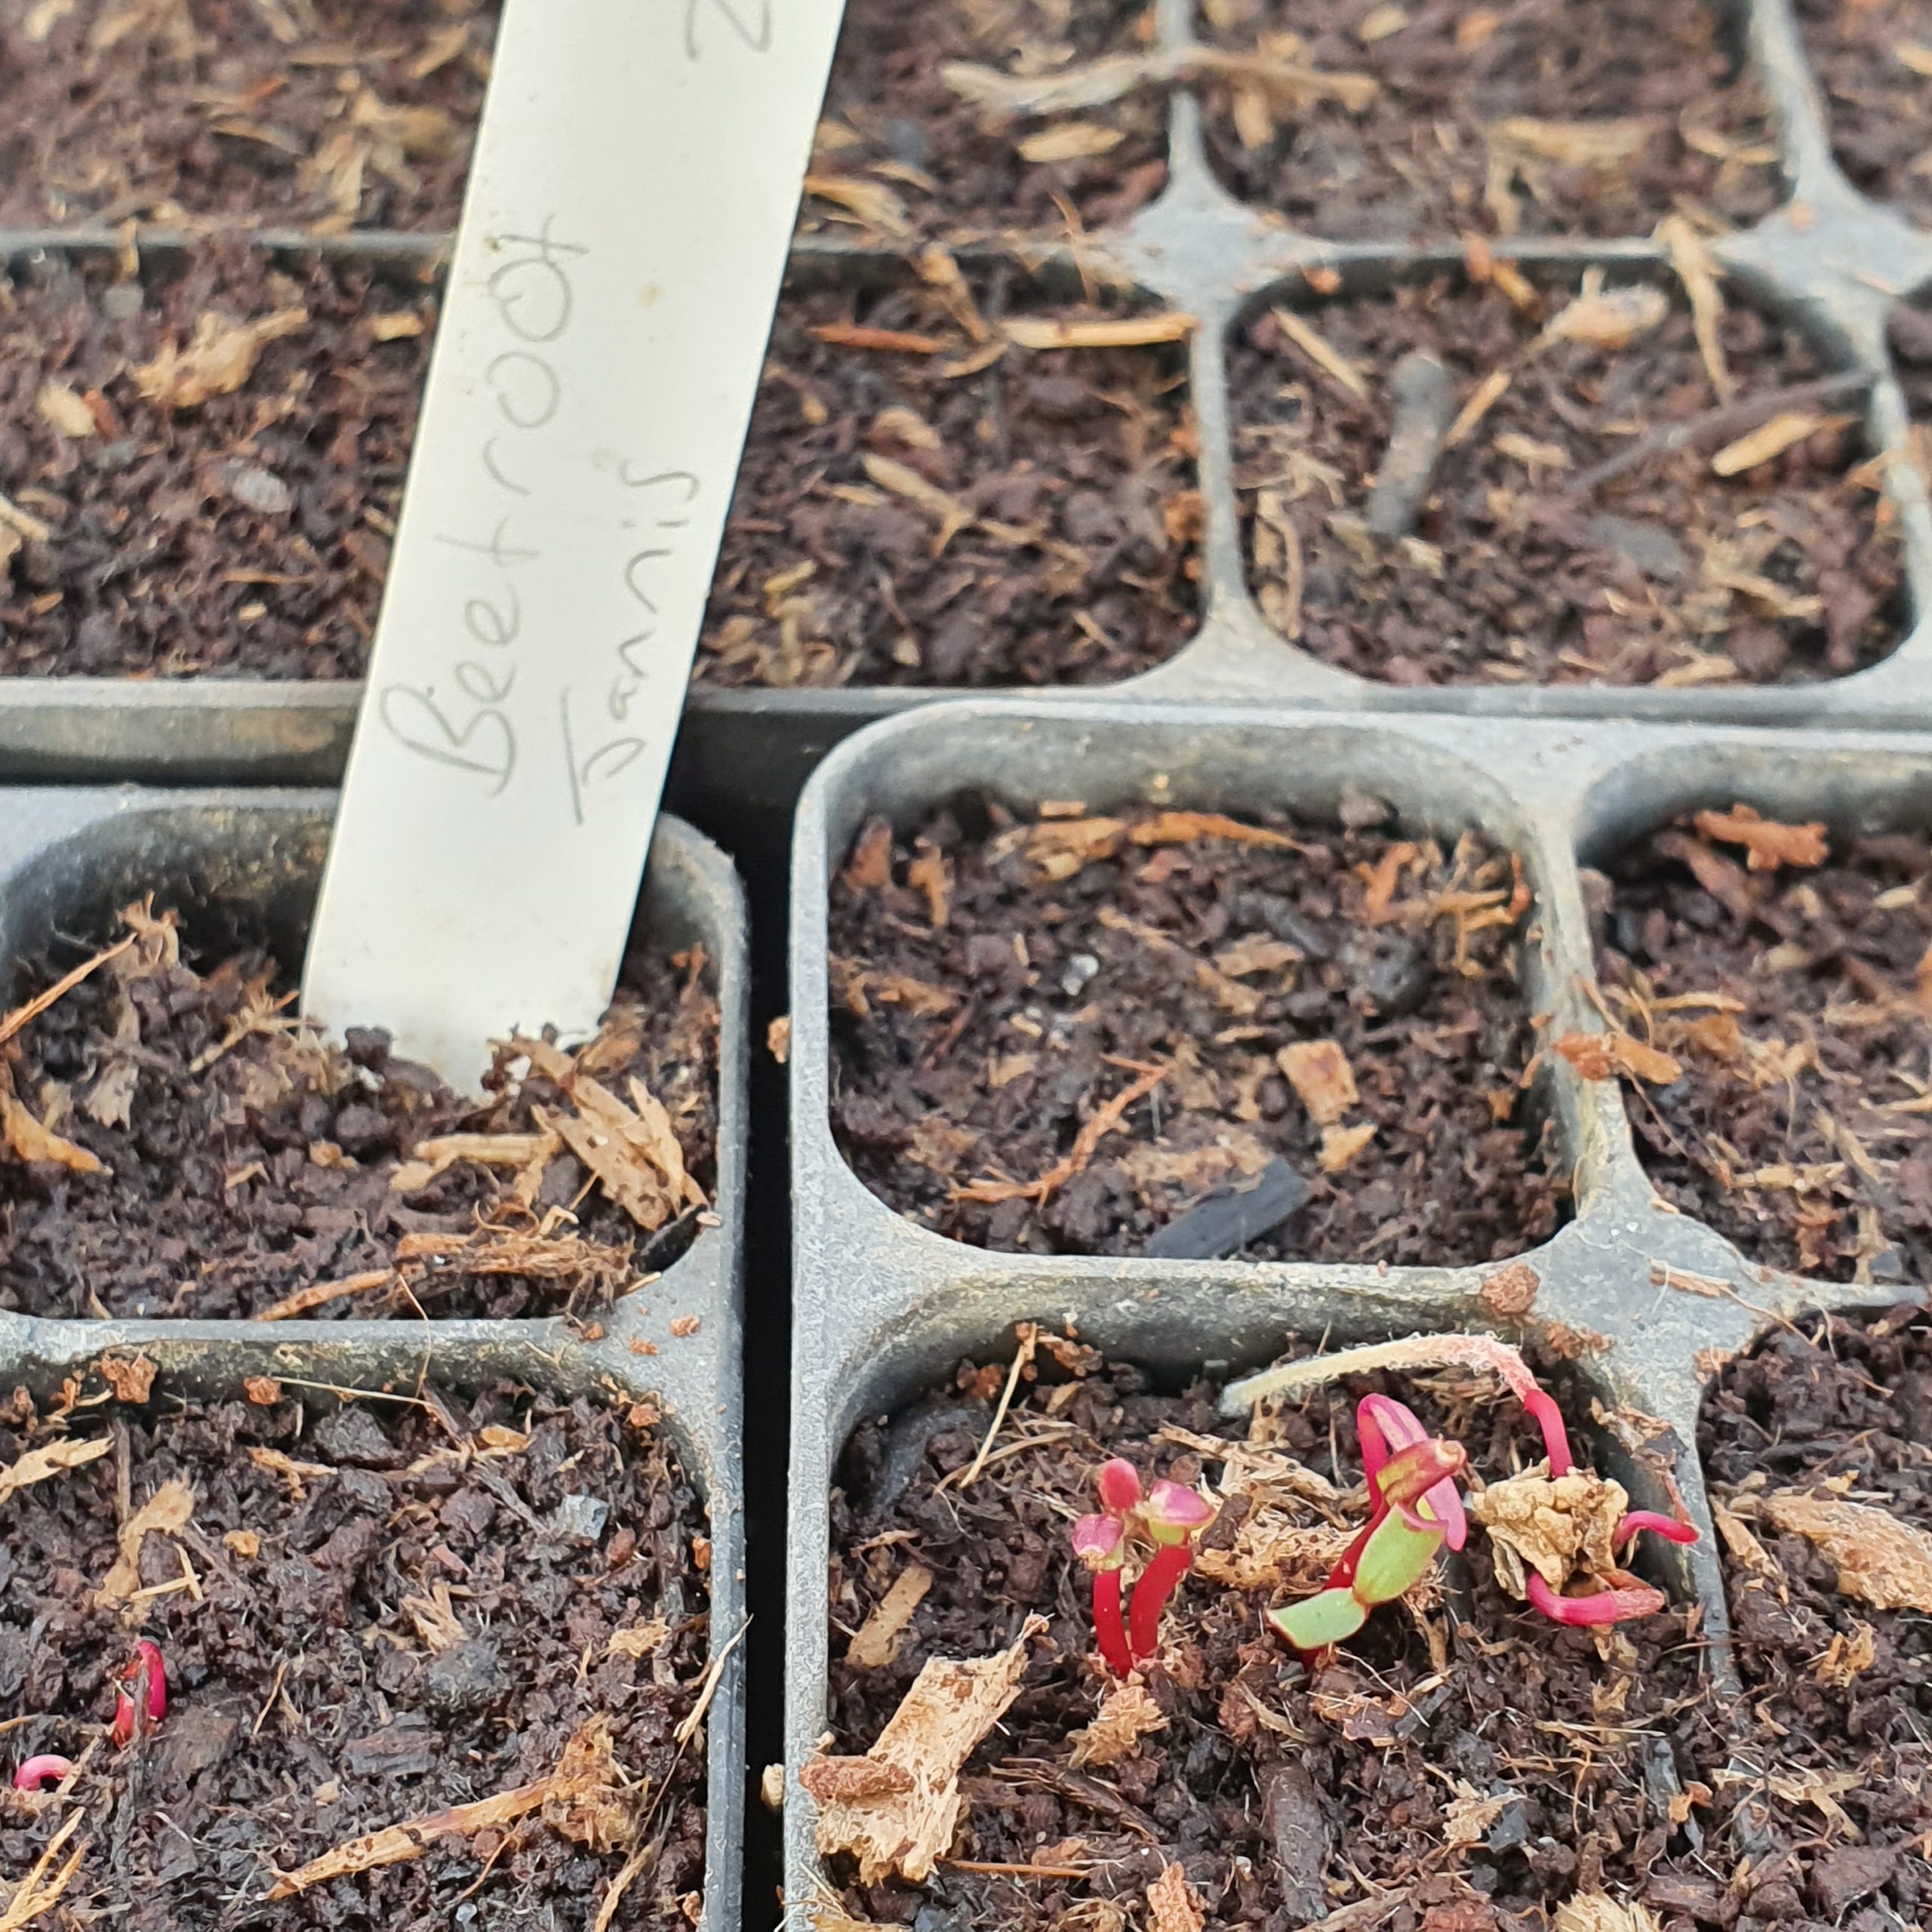
Veg in the Spotlight – Beetroot


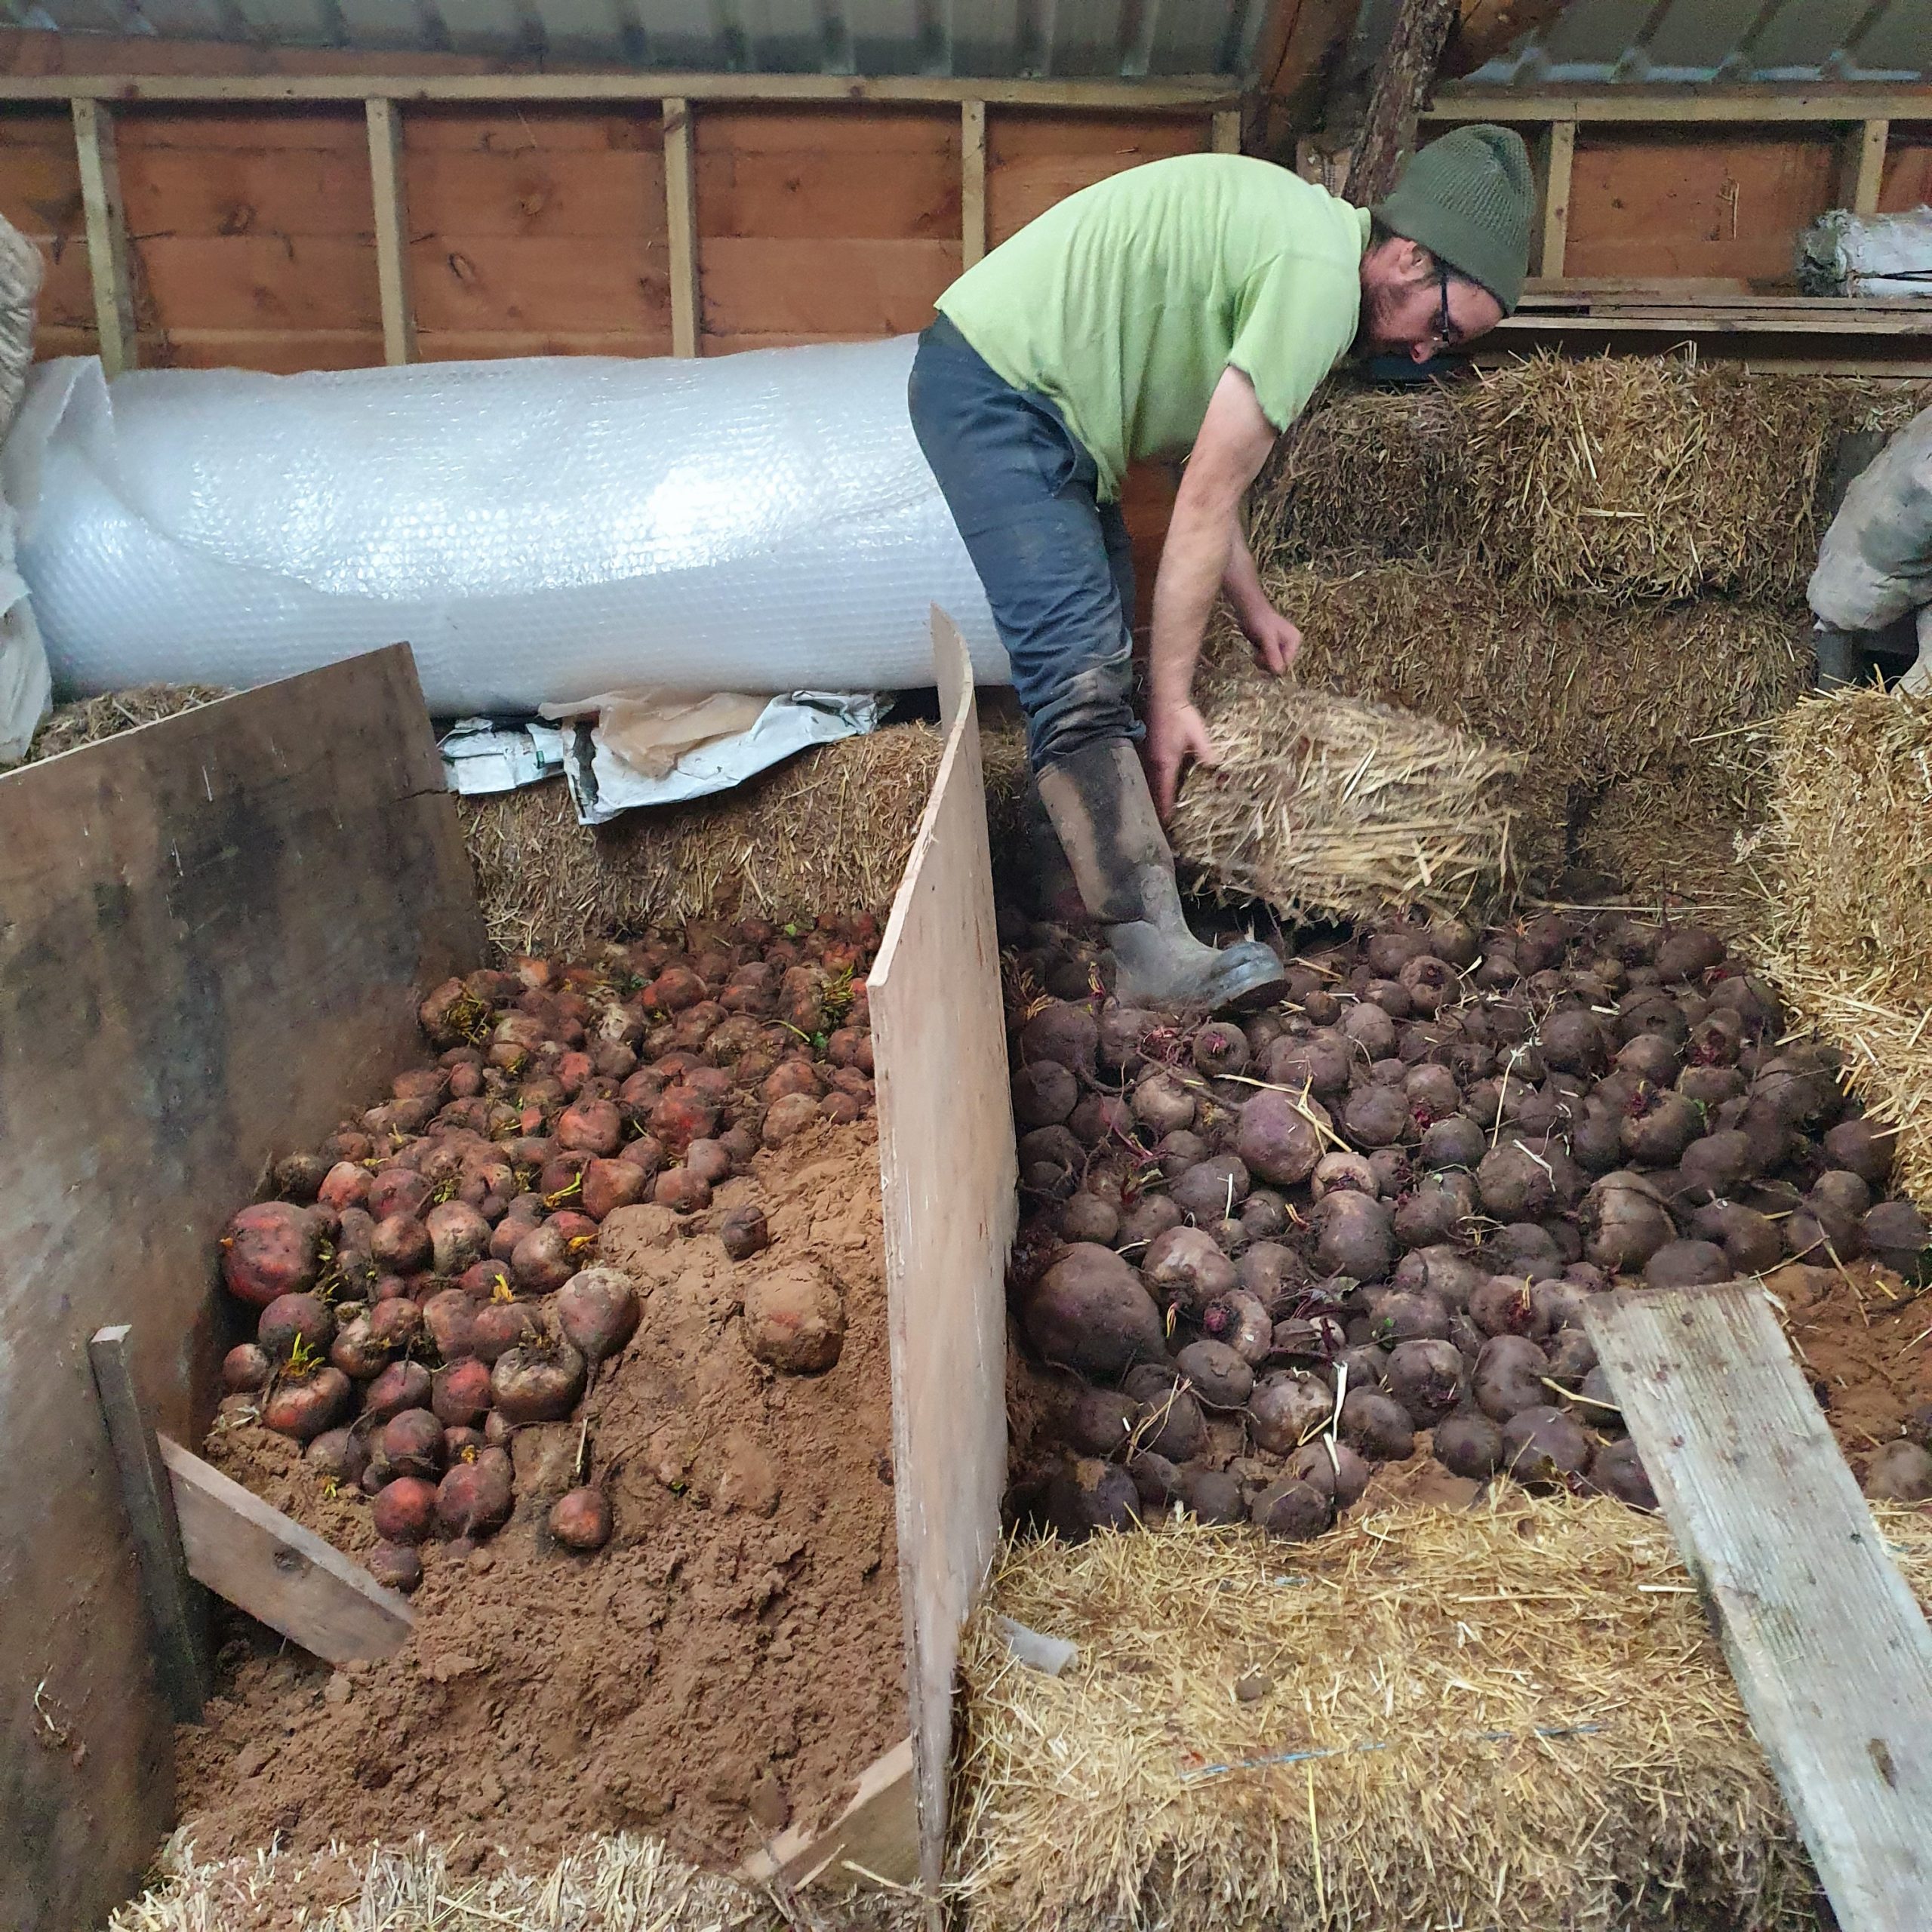
Beetroot (both golden and purple/red) have been in a share regularly over recent weeks as we had a good harvest last year. They are a staple of our winter shares since we can store them well in damp sand ‘clamps’ through the winter and into the spring. Here are a few ideas for how to use them if you’re finding it difficult to get through the quantities in the share:
Beet kvass – fermented beets
Fermenting is a great way to increase the nutritional value of a food by introducing ‘friendly’ bacteria that help give a diverse microbiome in the gut when they are eaten. It also helps to extend the shelf life of food and spread useable period across a longer stretch of time, as you can be eating the food fresh while a batch is fermenting and then eat the fermented foods after that.
Here’s a link to the recipe I’ve been using for several years. It produces tangy cubes of beet and a thick liquid you can drink as a tonic or use in a number of other ways suggested in the recipe. If it develops a white scum on the surface, just mix it in. Use something to keep the beets below the surface, eg. a jam jar that fits exactly inside your fermenting container (a larger jar in my case), and this will prevent lumps of mould forming.
Beet soup aka borscht (this is an adaptation of the recipe in my old and well used copy of the Cranks recipe book)
Chop an onion and fry it until it’s beginning to soften. Add c. 450g beetroot cubed, a medium potato also cubed, a stock cube or a teaspoonful or so of yeast extract, a bay leaf and water to cover. You can also increase the nutritional value by adding red lentils, maybe 100-150g and increasing the water. When everything is cooked (though the beets might still be quite firm), remove the bay leaf and blend until smooth. Add some ground nutmeg (not too much as it’s strong), freshly ground black pepper and cider vinegar (or whatever vinegar you’ve got would probably be fine) – c. 1-2tbsp, to taste – it gives the soup a little bit of a sour edge. If you’ve got liquid from your beet kvass to use, you could add this once it’s off the heat – cooking it will kill all those lovely bacteria I mentioned above. Serve with a dollop of sour cream/crème fraiche/natural yoghurt and a sprinkle of parsley if you have some. According to the toddler in the house, the yoghurt is the main feature and she will devour quite a bit from eating the thin layer yoghurt that sits above it! (Sneaky mama trick!)
Other ideas:
Juiced – you could use a blender, some water and a piece of muslin if you don’t have a fancy juicer
Grated into a winter slaw
Roasted in chunks, with olive oil (add slivers of orange zest and a squeeze of fresh orange juice for extra zazoom)
Thinly sliced and crisped in the oven to make beetroot crisps
In brownies/cakes
Ideas from Ali and the grower team
2023: January news – A Veg Update
It’s been an eventful month on the farm and we wanted to keep our members in the loop. We were lucky that the ten days of heavy frosts thawed just in time to harvest the Christmas share but the jump from mild to prolonged sub zero and back again did wreak some havoc on the crops.
It’s been hard to tell the longer term effects but we did have some clear casualties: the broad beans, outdoor salad and chard were killed and other crops damaged like some brassicas and carrots. Even some of our storage crops were affected. They are not lost but the worry is they won’t last as long as normal and are now not as healthy.


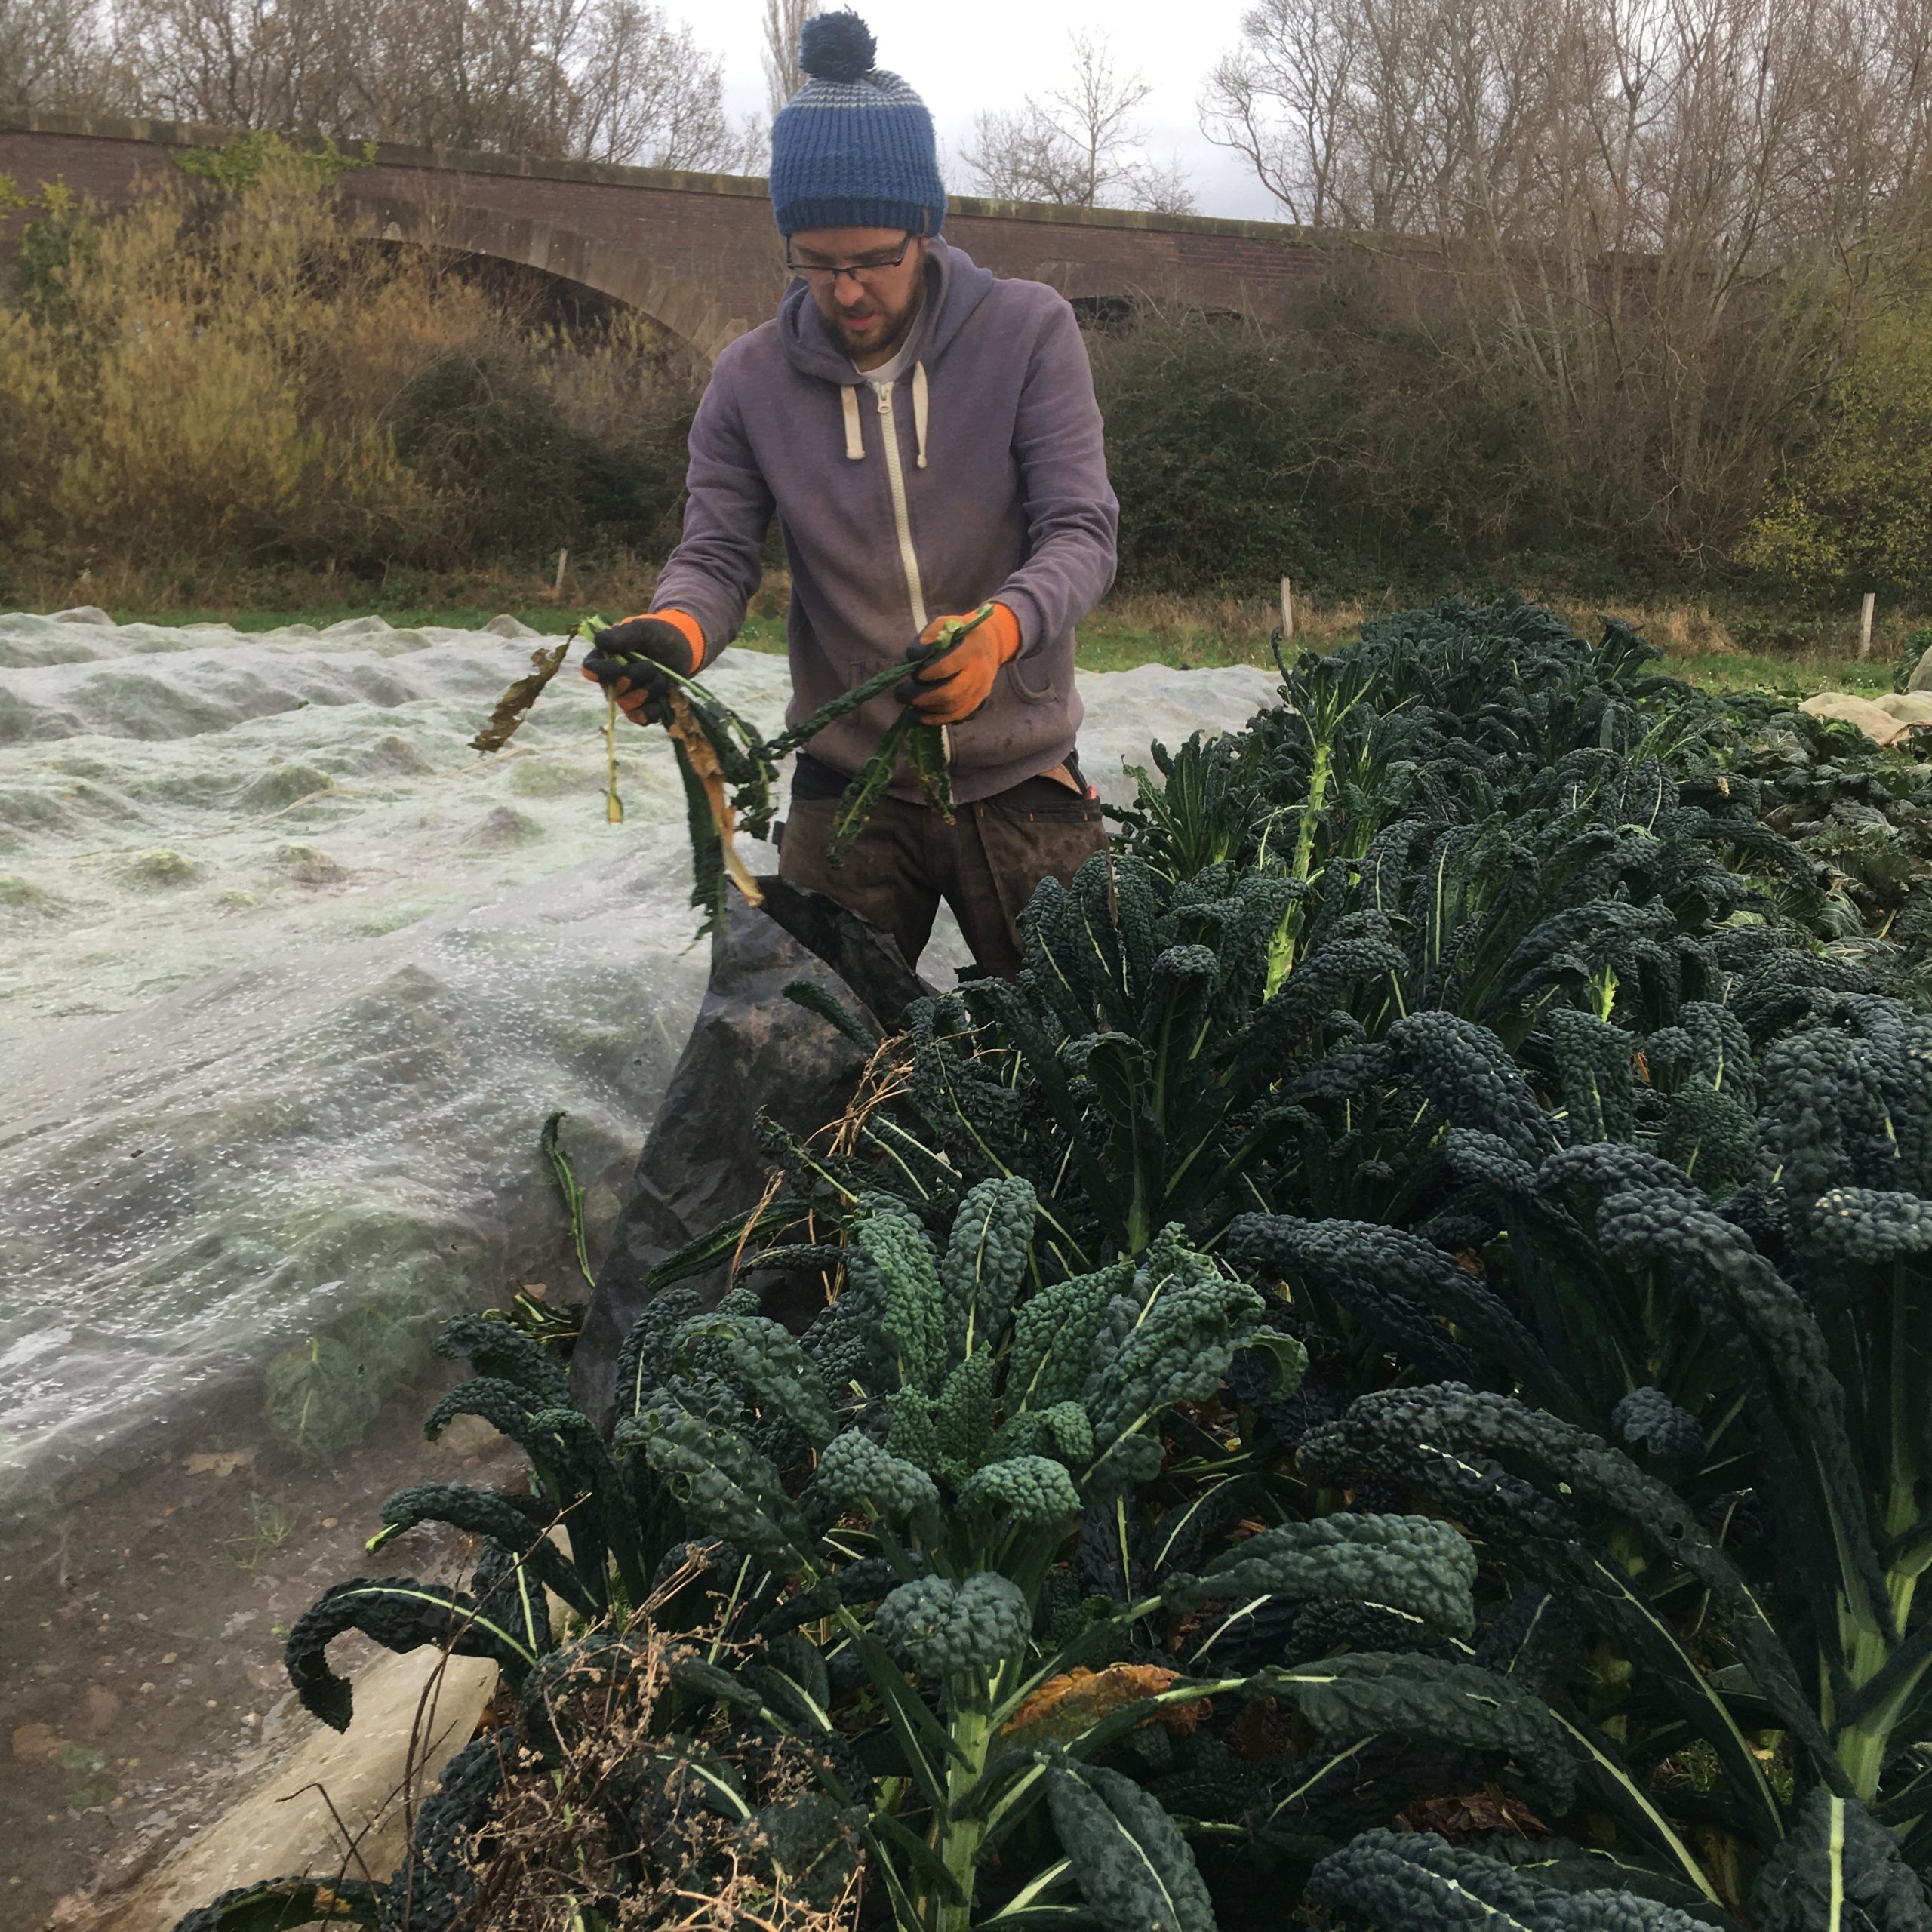
We are closely monitoring all of this and will decide on a course of action if needed. It may be that our annual harvesting gap in May and early June is more pronounced than usual. Some things we don’t yet know and it depends on how well the plants recover – it is always surprising how much renewal is possible. The kale in the fields bounced back well from the heavy frosts in December and there are also over wintering greens coming on nicely in the tunnels and the remaining parsnips are coming off the field looking good.
We don’t want to worry members, but give an honest picture of where we’re at and why the veg is as it is. Some of the crops, like the potatoes haven’t been too good because of summer drought conditions, and it’s quite heartbreaking to know that other plants we tended through that drought then succumbed to frosts. It’s not just Canalside but also many other farms that have been affected. This is where our CSA model hopefully comes into its own – sharing the risks and the rewards together. We’re doing our very best to get you as much good veg as we possibly can!
Farmers managing weather is a story as old as time, and, some of these are new challenges facing us. There are lessons to be learnt and strategies to be put in place e.g. better irrigation for droughts, different storage or protection measures for ongoing heavy frosts.
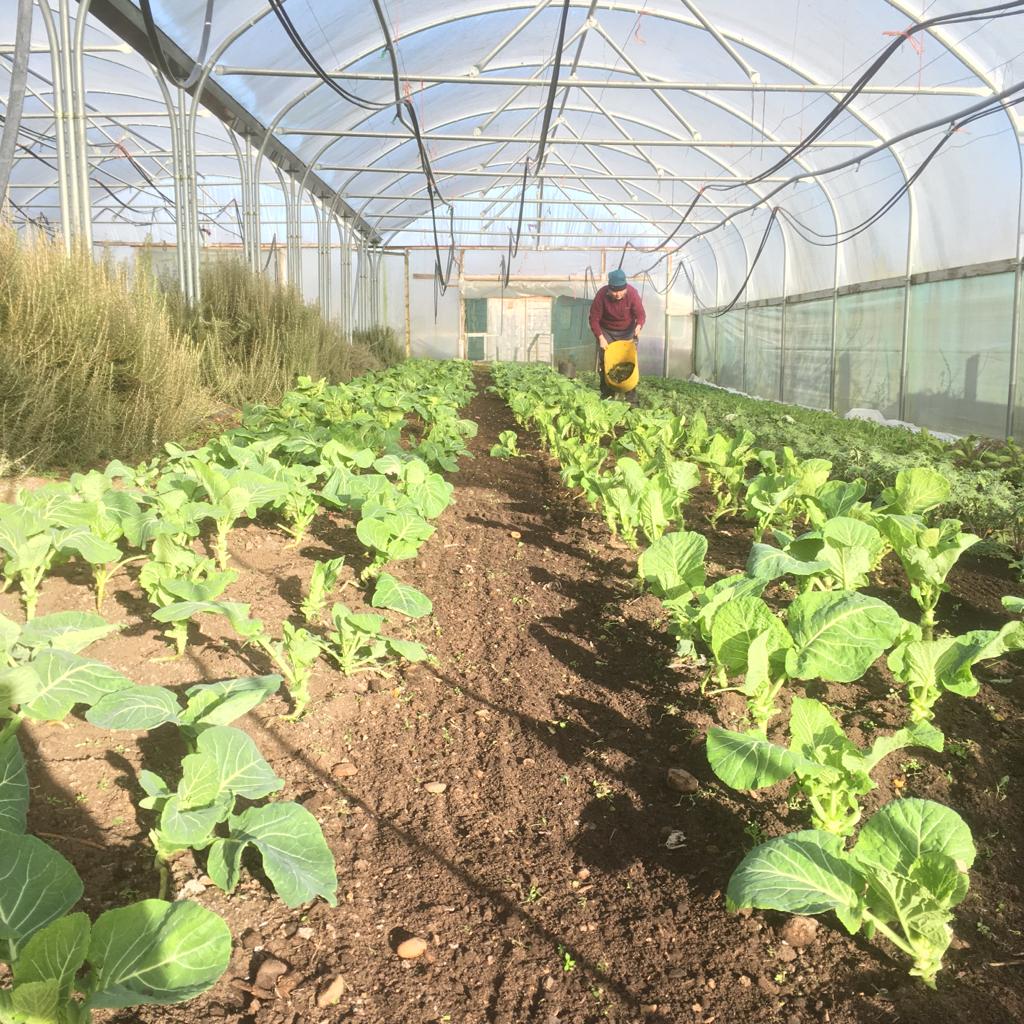
We’re currently working hard to get the new growing season underway without a hitch so we can plant new crops from late January onwards, according to our crop plans. We’re re-skinning our damaged polytunnel, building new hotbeds ready for propagation and fixing fences. Our volunteers have been working hard and we are determined to meet the challenges. Here’s praying for a more stabilised season ahead!
In hope,
Eleanor, Stephen and Lena
The growing team.
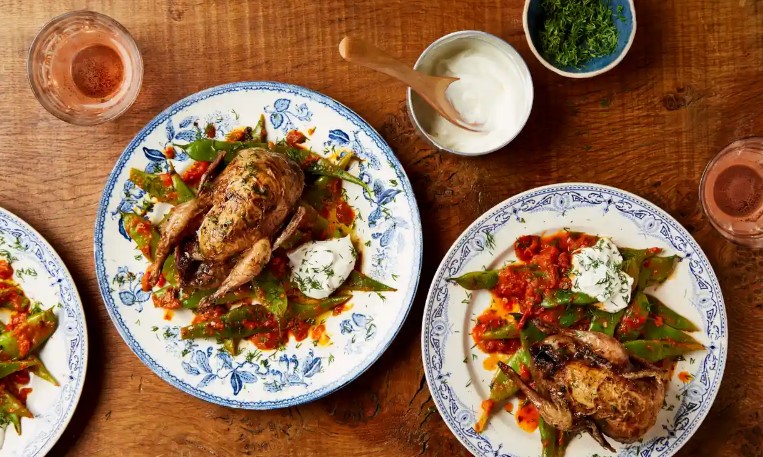
A Recipe from Rebecca: Thomasina Miers’ Quail with Turkish Runner Beans
Quail cook in no time; you can order them from Aubrey Allen, in Leamington. Here the little birds are served on a bed of runner beans tossed with a spicy, roasted tomato and red pepper sauce, and topped with Greek yoghurt and a sprinkling of dill. Serve with good bread for a really special dinner.
Thomasina points out that the sauce is also delicious on pasta. Cook some spaghetti, and throw in some spinach a few minutes before it’s done. Drain (keeping back a teacup of the cooking water), return to the pan, and stir in the sauce, along with the teacup of water. Mix together over low heat for a minute or two, to allow the flavours to meld, and serve with some grated cheese.
Quail with runner beans and roast red pepper and tomato sauce
Serves four.
Ingredients
For the Turkish beans
2 red peppers
2 garlic cloves, skin left on
4 medium tomatoes, cut in half
salt and pepper
1 teaspoon thyme leaves, divided into two portions
2 tablespoons olive oil, plus extra to drizzle over the tomatoes and peppers before they roast.
700g runner beans, tough outer edges shaved off, and cut into 4cm lengths
For the quail
1 garlic clove, peeled
¼ teaspoon salt
½ teaspoon ground cinnamon
½ tsp ground allspice
2 tablespoons olive oil
4 quails
2 teaspoons harissa
To serve
Greek yoghurt
Fresh dill, finely chopped
Method
Prepare the Turkish beans: Heat the oven to 220C. Put the peppers and the 2 cloves of unpeeled garlic on one side of an oven tray and the tomatoes (skin side up) on the other. Season everything with salt, pepper, half the thyme, and a drizzle of oil. Roast for 20 minutes, then check on the garlic: if it’s soft, remove from the tray and set aside. If not, give it three or four minutes more. Turn over the peppers and return the tray to the oven for five to 10 minutes, until the peppers and tomatoes are slightly blackened. Set aside and leave for 10 minutes.
Once they are cool peel the skin off the peppers, using your fingers or a small knife. Discard the skin, and then cut in half. Remove and discard the seeds and stem. Slip the roast garlic out of its papery skin. Put the garlic, peppers and tomatoes in a food processor, add the remaining thyme, harissa and the two tablespoons of olive oil, and blitz to a coarse sauce. Season to taste and transfer to a medium saucepan.
Bring a pan of salted water to a boil and cook the beans for five minutes, or until al dente. Drain, and then tip the beans into the sauce. Mix together and cook on a low heat for five minutes, so the sauce thickens and reduces, and thoroughly coat the beans. Set aside; when you are ready to serve reheat it over a gentle flame until it is warmed through.
Prepare the Quail: Preheat the oven to 220C. Crush the garlic to a rough paste in a pestle with the salt, then add the cinnamon, allspice and two tablespoons of oil. Put the quail on an oven tray and rub all over with the spiced oil. Roast for 25-30 minutes, until the skin is crisp and the legs come away easily from the sides. Leave to rest for 10 minutes.
To serve, spoon some of the beans on to the centre of each plate and top with a quail. Finish with a dollop of yoghurt and a scattering of chopped dill.
Recipe adapted from The Guardian, 2017
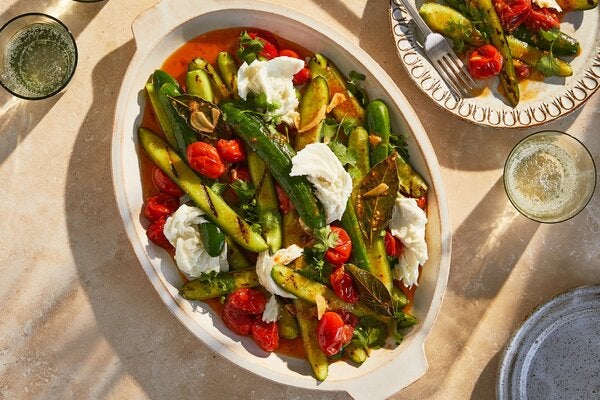
A Recipe from Rebecca: Grilled Cucumbers with Tomato-Cardamom Dressing and Mozzarella
Here is another thing to do with cucumbers when you tire of slicing them into salads. Yotam Ottolenghi remarks that ‘grilling cucumbers gives them a nice charred flavor while retaining their bite. . . Torn mozzarella adds richness to the cucumbers doused with a garlicky, spiced tomato dressing’. You could also grill the cucumbers on an outdoor grill, if you run to such things. I used a mixture of cucumbers and slim courgettes, which worked very well. Serve with some good bread to soak up the excellent tomato sauce.
Grilled Cucumbers with Tomato-Cardamom Dressing and Mozzarella
Serves 4 as part of a larger meal or 2 as a main
Ingredients
For the Tomato Dressing
500g tomatoes, chopped into large chunks
7 tablespoons olive oil
6 garlic cloves, peeled and thinly sliced
2 teaspoons white miso
4 fresh bay leaves
18 cardamom pods, roughly crushed in a mortar and pestle
½ teaspoon sweet smoked paprika
½ teaspoon salt
2 tablespoons lime juice
a few grinds of black pepper
For the Cucumbers
800g cucumbers (you could instead use slim courgettes, or a mixture of both)
1 tablespoon olive oil
½ teaspoon salt
a few grinds of black pepper
1 ball buffalo mozzarella (about 125g), roughly torn
about 8g coriander leaves and soft stems, roughly chopped
Method
Start with the dressing: put the tomatoes, oil, garlic, miso, bay leaves, crushed cardamom pods and seeds, paprika, and salt in a large (lidded) sauté pan. Place over medium-high heat, give everything a good stir and heat, uncovered, until it starts to bubble gently.
Once the dressing is bubbling, turn the heat down to medium-low, cover with the lid and cook gently for 15 minutes, stirring once, until the tomatoes have burst and start to release their juices. Turn down the heat if necessary; you want the garlic to soften without taking on colour, and you don’t want the tomatoes to disintegrate completely. Remove from the heat, stir in the lime juice, season to taste with pepper, and set aside.
Now prepare the cucumbers (or courgettes): halve the cucumbers (or courgettes) lengthwise and then halve each of these pieces lengthwise, to make four long cucumber wedges. You need these to fit into your griddle pan, so cut them in width-wise if necessary, to make shorter lengths. Put the vegetables into a bowl and toss with the oil, salt, and a good grind of pepper.
Heat a grill pan over high, and open a window. This might get a bit smoky.
When the grill pan is very hot, grill the cucumbers (or courgettes) in batches, cut sides down, for 2 to 3 minutes, then flip them over and grill for 1 to 2 minutes more. You want nice grill marks and for the cucumbers to soften but still retain a bite. Courgettes will take a little longer. As they become ready, transfer to the tomato pan, stirring to coat in the dressing.
Once all the veg have been grilled, stir the coriander into the pan and transfer the mixture to a large serving platter. Sprinkle on the torn mozzarella, along with a good pinch of salt, and serve hot or at room temperature.
Recipe adapted from Yotam Ottolenghi in New York Times Cooking
A Recipe from Rebecca: Vicki Behm’s Lentil Salad
Vicki Behm is an outstanding cook, and this is a very good salad. As the name implies, it keeps well, in addition to being tasty. Consider packing some in a box to take to work for lunch. I think you could use other types of green olive if you don’t have any Castelvetrano olives to hand.
Make-Ahead Lentil Salad, 4 servings
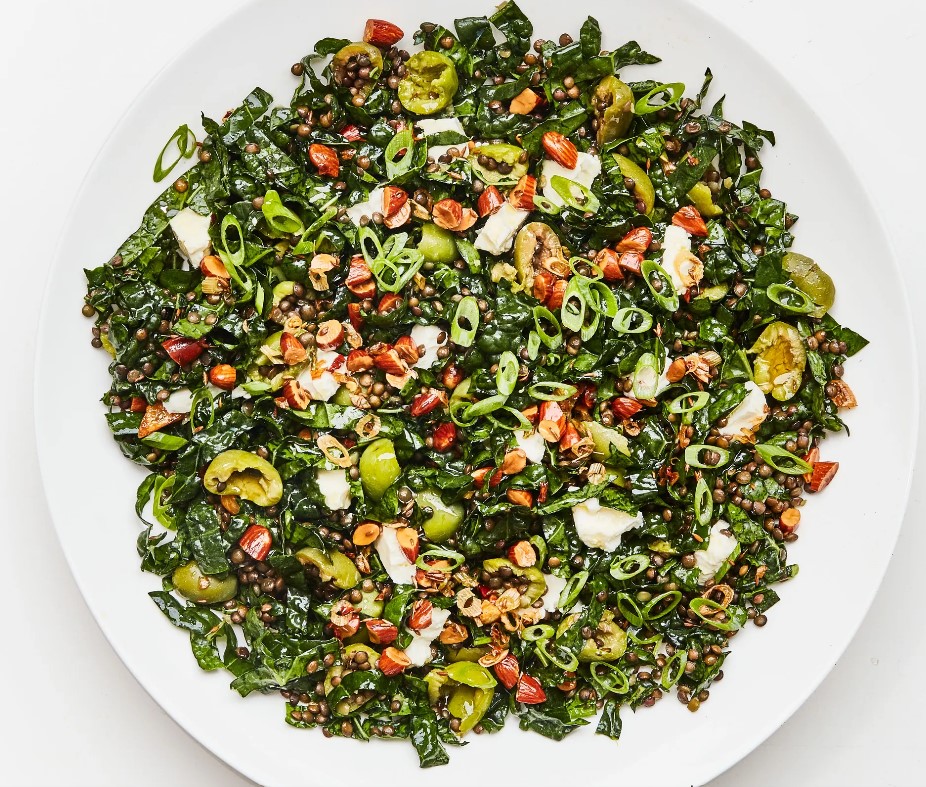
Ingredients
1 large bunch kale
12 ounces (measured in a measuring jug) of puy lentils
3 spring onions
4 garlic cloves
1 lemon
4 tablespoons olive oil
4 tablespoons raw almonds, coarsely chopped
1 tablespoon cumin seeds
½ teaspoon crushed red pepper flakes
140g feta
150g Castelvetrano olives, crushed with the side of a knife, and pits removed
salt
Method
Strip the kale leaves off the stems; discard stems or save for later. Stack the leaves on top of each other, then roll into fat cigars. Slice crosswise into ½ cm strips to form long, thin ribbons. Unfurl the ribbons. If any are really, long cut these into shorter ribbons that will be easier to get into your mouth. Transfer the ribbons to a large bowl, season with salt, and then use your hands to massage the kale: scrunch the kale up in your hands for 1 to 2 minutes, until it is silkier, softer, and darker in colour. This makes it more tender and nicer to eat raw. Place the kale ribbons in a large serving bowl.
Bring a large pot of heavily salted water to a boil over high heat. Add the lentils, reduce heat to medium, and simmer, uncovered, until the lentils are tender but still al dente, about 20–25 minutes. Try not to overcook them or they’ll be mushy.
While the lentils are cooking, prepare the spiced oil. Trim the spring onions and separate white and green parts. Thinly slice the white parts and transfer to a small skillet. (Keep the green parts—they will be used later in the recipe.) Peel the garlic and crush it with a knife. Add those to same skillet. Using a vegetable peeler or paring knife, remove three 8cm strips of lemon peel (avoiding white pith); reserve the rest of the lemon for your salad dressing. Add peels to skillet as well. Now pour the olive oil into skillet and stir so that all of the elements are coated in oil.
Heat the skillet over medium heat. Cook, stirring occasionally, until the garlic starts to brown and the lemon peel starts to curl, about 3 minutes. Add the almonds and cook, stirring frequently, until almonds are browned, about 3 more minutes. Remove from heat and stir in the cumin seeds and red pepper flakes—the residual heat from the oil will warm those spices and bring out their flavours.
Strain the oil mixture through a fine-mesh sieve into a small bowl, shaking to help the oil drain. Don’t throw away the stuff in the sieve! The oil will form the base of your salad dressing and the stuff in the sieve will add crunch to the salad. Spread the contents of the sieve on a paper towel-lined plate, season with salt, and let cool. The nuts will get crunchier as they sit.
Crumble the feta into the bowl with the kale. Tear the olives into large pieces and add them to the bowl as well. Thinly slice the reserved spring onion greens and add most of them to the bowl, reserving just a few for a garnish. Juice the lemon and add it, along with ½ teaspoon salt, to the serving bowl.
Once the lentils are cooked, drain them well, shaking to get rid of excess moisture, and add to bowl; season with salt. Add the infused oil and half of almond-spice mix, and toss to combine. Garnish with the remaining nuts and spices, and spring onion greens, and serve.
Recipe adapted from Bon Apétit, 2020
A Recipe from Rebecca: Refrigerator Pickles
My grandmother used to make refrigerator pickles, which (as the name implies) need to be stored in the fridge. Here is an easy recipe for converting an abundance of courgettes into crisp, dilly pickles to have alongside your sandwich or in a burger.
Refrigerator Courgette Pickles
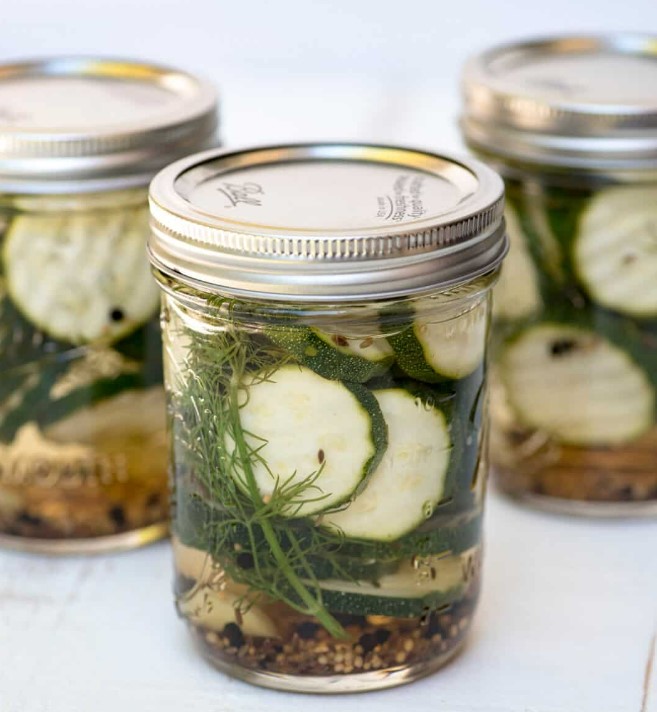
Ingredients
For the Pickles
3 garlic cloves, peeled and halved
1½ teaspoons black peppercorns
1½ teaspoons mustard seed
6 sprigs of fresh dill
700g courgettes
For the Brine
500ml water
250ml white vinegar
4 tablespoons sugar (I used muscovado)
2 tablespoons coarse sea salt
Method
Sterilise the jars in which you intend to store the pickles by pouring boiling water over them; you’ll need about 4 normal-sized jam jars or the equivalent. (See note below, as well.)
Divide the garlic, peppercorns, mustard seed and dill between them.
Wash, top and tail the courgettes. Slice into circles or spears, as you prefer, and pack neatly into the jars. Leave a bit of space at the top of each jar, so the courgettes can be covered completely in the brine.
Heat the brine ingredients over medium-high heat in a saucepan and boil until the sugar and salt dissolve.
Carefully pour the brine into your jars, put on the lids, and let cool to room temperature. (See note below, as well.)
Give the jars a good shake to distribute the spices and then store in the fridge for at least 24 hours before eating. They should last for some weeks.
NOTE: If the courgettes float to the surface you might want to weigh them down with something, to ensure they remain submerged in the brine, e.g. a smaller jam jar, ramekin dish etc. Make sure you sterilize these, too, with boiling water.
Recipe adapted from Valerie Brunmeier, Valerie’s Kitchen (2017)
A Recipe from Rebecca: Miso and Butter Roast Cabbage with Sesame Noodles and Chile Oil
Griddled cabbage roasted with a buttery miso sauce and served with sesame-tahini noodles creates a complex set of flavours perfectly highlighted by a garnish of chile oil and spring onions. Thomasina Miers, whose recipe this is, gives a good description: ‘Toss the miso hispi in noodles and drizzle with chilli oil, and you have a deeply satisfying, midweek dish that is rich in grains and vegetables, and as healthy as it is delicious’. Hispi cabbage are those torpedo-shaped hispi cabbages we’re getting from Canalside, which in the shops these are sometimes rather coyly called ‘sweetheart’ cabbages.
The original recipe calls for egg noodles, but it works well with wholewheat linguine or brown rice noodles. I think you can use any noodle you favour.
If you want a particularly delicious menu, finish off with some fresh mango for pudding.
Miso and Butter Roast Hispi with Sesame Noodles
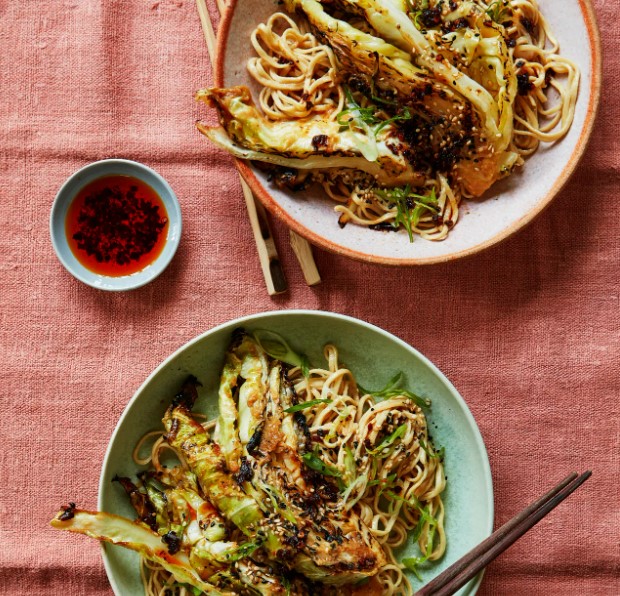
Serves 4
Ingredients
For the Cabbage
40g butter, softened
70g white miso
2 teaspoons honey
1½ tablespoons soya sauce
4 spring onions, roughly sliced, white and green parts separated
2 large hispi (aka sweetheart) cabbages, each cut into 8 wedges through the stem
For the Noodles
500g whole-wheat linguine (or another noodle of your preference)
5 tablespoons tahini
2 tablespoons sesame oil
2 tablespoons rice-wine vinegar
2 teaspoons honey
2 teaspoons toasted sesame seeds, to garnish
Chile oil, to serve
Method
Heat the oven to 240C (220C fan). Heat a griddle pan or, if you don’t have one, the grill.
Prepare the cabbage:
In a small bowl, mix the butter, miso, honey, soya sauce and the whites of the spring onions.
Griddle or grill the cabbage wedges for 10-12 minutes, turning them when lovely griddle marks appear on each side. Transfer to an ovenproof pan with a lid and spoon over the miso butter. Cover and roast, turning the cabbage once, for 15 minutes, until tender.
Prepare the noodles:
While the cabbage is roasting, bring a pan of salted water to a boil and cook the noodles according to the packet instructions. As they cook, whisk the tahini, sesame oil, vinegar and honey to create a thick paste. Taste, then adjust the seasoning with more honey and/or vinegar. Once the noodles are cooked, drain, reserving about 200ml of the cooking liquid. Slowly mix the cooking liquid into the tahini to create a creamy sauce. Pour some (or all) of it onto the noodles, so that they are dressed to your liking.
Pile the noodles onto a serving platter or bowl and lay the cabbage wedges on top. Spoon over any cabbage cooking juices, scatter on the green parts of the spring onions and sesame seeds, and serve with chile oil to drizzle over the top, to taste.
Recipe adapted from Thomasina Miers, Guardian (2021).
A Recipe from Rebecca: Cucumber and Avocado
Avocado and cucumber drizzled with sesame oil and soya sauce: scarcely a recipe, but extremely delicious. I first ate something like this at the wonderful Nana’s Restaurant on Regent Street, in Leamington.
Homage to Nana’s
Serves 2 as a side dish
Ingredients
1 large, ripe avocado
1 cucumber of any size
Toasted sesame oil
Soya sauce
1 tablespoon sesame seeds, toasted
Preparation
Cut the avocado in half and remove the stone. Cut the avocado into 1.5cm cubes and carefully lever out of the shell and array on a serving plate.
Cut the cucumber into similarly-sized chunks and mix with the avocado.
Drizzle the sesame oil and soya sauce over the vegetables and sprinkle with some sesame seeds as a garnish and enjoy.
A Recipe from Rebecca: Cumin-Scented Greens with Eggs, Feta, Lemon and Herbs
Shakshuka usually consists of eggs poached in a spicy tomato sauce. This is a green version, where the eggs are poached on top of a savoury mixture of cumin-scented greens, and then topped with feta, lemon and herbs. Serve it with good bread and some harissa if you’d like to spice it up a bit. Red or green, shakshuka is apparently a popular North African and Middle Eastern breakfast dish. It is also very nice for dinner, and uses only one pan.
We made it with some amazing duck eggs, which are huge and extra unctuous, so if you happen to have some lying around this is a good opportunity to use them. Ordinary eggs will be delicious too, though.
Green Shakshuka

Serves 2
Ingredients
3 tablespoons olive oil
1 large onion, roughly chopped
½ teaspoon salt
2 teaspoons cumin seed
1 teaspoon coriander seed
2 large garlic cloves, sliced thin
650-ishg greens (spinach, chard, spring greens, or a mixture), chopped
25g coriander, dill, mint, parsley, or a mixture, chopped
a wineglass (about 200ml) of white wine, or use water
2-4 eggs
100g feta, crumbled
half a lemon
Harissa and crusty bread, to serve
Method
Over medium heat, warm the oil in a frying pan and add the onion and salt. Reduce the heat to low and cook 5-10 minutes, or until the onion has softened.
While the onion is cooking toast the cumin and coriander seeds in a dry frying pan until fragrant. Keep an eye on it so it doesn’t burn. Set aside to cool a little and then grind it in a mortar and pestle (or use pre-ground spices).
Increase the heat back to medium and add the ground spices and garlic to the pan with the onion and stir for another minute or two, until it smells good.
Add the greens and most of the herbs—but keep a big handful of the herbs aside to use for a garnish. Stir everything together and sauté until the greens begin to wilt a bit. Add the wine or water, and cook for another 8-10 minutes, or until the greens are tender.
Once the greens are tender, use a spoon to create two to four little nests in the mass of cooked greens—one for each egg you intend to use. Crack each egg on the side of the pan, one at a time, and slide it into its nest. Cover the pan and cook for 4-6 minutes, or until the whites have set and the yolks are to your liking.
Remove from the heat and top with the feta. Grate the zest of the lemon onto the feta and then squeeze over the juice. Sprinkle with the remaining herbs and serve, with harissa and crusty bread.
Recipe adapted from BBC Good Food.